
Hands arranging content strategy note cards
Written by webtechs

SEO Content Strategy for Phoenix Businesses: A Practical Plan

Build a pillar page surrounded by three to five cluster pages tied to one revenue-driving service, prioritize local intent over broad keywords and repurpose each piece into multiple formats before you write anything new. That is the shortest path to better local visibility for a Phoenix business. Search engines and AI answer tools now reward sites that show clear topical authority with real proof behind it, not just page count. Webtechs has built this exact structure for Scottsdale and Phoenix-area clients, and the pattern holds: focused clusters beat scattered blog posts almost every time.

Key Takeaways

A pillar page supported by three to five cluster pages, built around one revenue-driving topic and reinforced with local Phoenix signals, is the fastest reliable path to better local search visibility.

Point Details
Start with local basics Fix Google Business Profile, NAP consistency, and service-area pages before publishing new content.
Pick one revenue-tied pillar Choose a topic connected to your highest-margin service, not the highest search volume.
Publish spokes before the pillar Launching cluster pages first builds internal linking momentum for the pillar page.
Measure clusters, not single articles Track rankings, leads, GBP actions, and AI citation mentions monthly.
Webtechs builds the full structure Webtechs runs audit, cluster build, content writing, and reporting for Phoenix-area businesses.

Table of Contents

What Is an SEO Content Strategy, and Why Does It Matter in Phoenix?

An SEO content strategy is a plan for what you publish, how it connects, and how often, all built around a defined topical territory instead of random keyword chasing. It combines a pillar page (your broadest, most authoritative page on a core service) with cluster pages that answer narrower questions and link back to it. Done right, it maps directly to business outcomes:

  • Visibility: consistent publishing on one topic signals expertise to Google and AI search tools alike.
  • Local citations: content built around Phoenix neighborhoods and service areas earns mentions and links from local directories and news outlets.
  • Leads: cluster pages targeting specific problems (“emergency AC repair in Tempe”) convert better than generic service pages.

Phoenix adds real texture here. Summer heat spikes drive seasonal search demand for HVAC, pool, and roofing services, and the metro’s sprawl means “near me” and neighborhood-specific searches carry more weight than in denser markets. A small-business content strategy that ignores that seasonality wastes months of runway.

What Quick Local SEO Wins Should Phoenix Businesses Make First?

Before you write a single cluster page, tighten these local signals. They cost little and often move rankings within weeks.

  • Fully optimize your Google Business Profile: categories, service areas, photos, and weekly posts.
  • Publish dedicated service-area pages for Scottsdale, Tempe, Mesa, Chandler, or wherever you actually work.
  • Add localized FAQs that mirror how Phoenix customers phrase questions (“how much does AC repair cost in Phoenix in July?”).
  • Confirm NAP (name, address, phone) consistency across your website, GBP, and directory listings.

Watch two signals monthly: whether you hold a map pack position for your top three services, and whether your local search intent examples match what customers actually type into voice assistants and mobile search.

Pro Tip: Build a short content piece around a recurring Phoenix event or pattern, like monsoon season roof damage or holiday retail traffic, and publish it a few weeks ahead of the seasonal spike. Search demand for these topics is predictable, and early publishing gives Google time to index and rank the page before the rush.

Hands inspecting roof damage after monsoon

What Are the Core Components of an Effective Content Plan?

A working content plan has five moving parts, and skipping any one of them weakens the whole structure.

Diagram of five components in content planning

Topical territory selection comes first. Pick one or two subject areas that map directly to your highest-margin services, not everything you offer. A roofing company might choose “storm damage repair” over trying to cover every roofing topic at once.

Pillar and cluster pages follow. The pillar covers the topic broadly (2,000+ words, comprehensive); cluster pages go deep on specific angles, each one owning a distinct question or intent. Topic clusters organize this relationship so both search engines and AI tools can map how your pages relate to each other.

Internal linking connects every cluster page back to the pillar, and the pillar links out to each cluster. This passes authority between pages and helps Google understand the full scope of what you cover.

Schema and structured content (FAQ schema, LocalBusiness schema, service schema) make it easier for search engines to pull your content into rich results and AI summaries.

Editorial calendar and modular repurposing close the loop. Turn one research-heavy piece into a blog post, a short video script, and a handful of social posts instead of starting from scratch each time. That approach, sometimes called a modular content engine, keeps small teams producing consistently without burning out.

Pro Tip: Choose your pillar topic based on revenue, not search volume. A pillar on “commercial roofing Phoenix” tied to $15,000 jobs beats one on a high-traffic topic that never converts.

How Do You Build and Launch Your First Topic Cluster?

Follow this sequence for your first cluster, start to finish:

  1. Audit existing content. Find pages already ranking or getting engagement; these become your hub or an early spoke.
  2. Select one topic. Tie it to a service that drives real revenue.
  3. Map keywords and intent. Separate informational questions from ready-to-buy searches.
  4. Write content briefs. Outline headings, target questions, and internal links before drafting.
  5. Publish cluster pages first. Get three to five spokes live before the pillar goes up.
  6. Launch the pillar and interlink everything. Link every spoke to the pillar and vice versa.
  7. Promote and repurpose. Push each piece through email, social, and Google Business Profile posts.

A few tactical notes: run quick keyword checks against your GBP insights and Search Console data rather than expensive tools alone, and add FAQ schema to every cluster page during the brief stage, not after publishing.

On sequencing, publishing spoke content before the pillar isn’t just a nice-to-have. It builds internal linking signals early, so the pillar page doesn’t launch as an orphan asset with nothing pointing to it yet.

How Long Does This Take, and What Does It Cost in Phoenix?

Expect a real launch phase, not overnight rankings. Most clusters need 0 to 12 weeks to get published and indexed, another 3 to 6 months to show early ranking movement, and 6 to 12 months before you see dependable local rankings and citation growth. A comprehensive framework for topical authority recommends holding a topical territory for 12 to 18 months to fully compound results, so patience matters as much as execution.

Spend your first dollars on content quality and internal linking before chasing volume. A cost-effective SEO strategy built around fewer, better pages consistently outperforms a rushed blog dump.

Which KPIs Actually Show a Content Strategy Is Working?

Track a handful of metrics that connect to revenue, not vanity numbers.

  • Local map pack and organic rankings for your pillar and cluster keywords.
  • Organic leads and phone calls attributed to content pages.
  • Google Business Profile views, clicks, and direction requests.
  • Citation share in AI answer surfaces (does ChatGPT or Perplexity mention your business when someone asks about your service in Phoenix?).
  • Assisted conversions where content touched the customer before they called or filled out a form.

Cluster-level performance matters more than any single article’s traffic. A small-business content strategy should measure engagement and conversions across the whole cluster, since one weak spoke can still support a strong pillar. Keep your monthly dashboard simple: rankings, leads, GBP actions, and one AI citation check.

What Does a Real Phoenix-Area Result Look Like?

Webtechs ran a focused SEO campaign for a music industry client that followed this same audit, cluster, promote, measure sequence. The result was a documented 4,490% increase in organic traffic, a scale of growth that reflects a highly targeted niche and shouldn’t be read as a typical baseline for every industry.

  • Before: minimal organic visibility and inconsistent content publishing.

  • After: sustained ranking growth and a measurable jump in qualified organic traffic.

  • Methodology: full content audit, cluster architecture build-out, promotion across relevant channels, and ongoing measurement against baseline metrics.

The lesson isn’t the percentage. It’s that a structured audit-to-measurement process, applied consistently, produces compounding results over time, even in a competitive niche.

What Should Phoenix Owners Prioritize First?

Fix your Google Business Profile and local service pages before writing a single blog post. Then pick one pillar topic tied directly to revenue, and build three cluster posts around it before expanding further. Do it yourself if you have a few hours weekly and patience for a slow build. Hire help when you need speed or lack bandwidth for consistent publishing. Either way, original proof and steady consistency compound with both local search and AI answer engines over time.

How Webtechs Helps You Build This Without Doing It All Yourself

Webtechs is the alternative to hiring a full in-house content team for a Phoenix business that needs a pillar and cluster strategy built right the first time. Instead of guessing at keyword research or piecing together a content calendar between other jobs, you get a team that has already run this exact playbook for local service businesses, from audit through publishing to reporting.

Webtechs

Webtechs handles local SEO, professional content writing, topic-cluster builds, and Google Business Profile optimization under one roof, so your pillar page and cluster spokes come out of the same strategic plan instead of disconnected assignments. The music industry case study shows what a focused campaign can produce when the structure is right. If you want to see past work before committing to anything, browse the Webtechs portfolio and request a local SEO audit to find out which pillar topic makes sense for your business first.

Where to Learn More and Take the Next Step

Frequently Asked Questions

What is the 80/20 rule in content strategy?
Focus resources there instead of spreading effort evenly across every topic.

How many cluster pages do I need to start?
Three to five cluster pages per pillar is enough to launch. You can expand the cluster later as you find new customer questions worth answering.

Should I hire an agency or do this myself?
Do it yourself if you have consistent weekly time and patience for a slower build. Hire an agency like Webtechs when you need faster execution or lack the bandwidth to publish consistently.

How do I know if my content strategy is working?
Watch local rankings, organic leads, Google Business Profile actions, and whether AI tools mention your business when answering related questions in your area.

Does this work for every type of Phoenix business?
The pillar and cluster approach works for most service-based and local businesses, though timelines vary by competition density and how established your current site already is.

Sources

Videographer writing script notes at desk
Written by webtechs

Video Scriptwriting for Aspiring Videographers Who Want Results

Videographer writing script notes at desk

A video script is the decision layer that determines exactly what an audience hears and sees, built to deliver one clear outcome rather than a general impression. Every solid script runs on the same spine: Hook, Promise, Payoff, Ask. Write the hook first. If you only take one thing from this article, it’s that one sentence: name the payoff in your opening line, then build everything else around getting there.

One rule anchors the math behind every script you’ll write: one page of double-spaced script equals roughly one minute of screen time. A 60 second social video runs about a quarter page. A five minute explainer runs multiple pages. That single conversion saves you from writing a script that reads fine but plays twice as long as your client, professor, or client’s client agreed to.

Key Takeaways

A usable video script starts with the Hook → Promise → Payoff → Ask spine, follows a Prep → Structure → Words → Revision workflow, and stays inside platform-specific length targets that follow the one-page-per-minute rule.

Point Details
Write the hook first State the payoff or stakes within the first 5 to 15 seconds to stop scroll-past behavior.
Follow the spine Structure every script as Hook, Promise, Payoff, Ask, regardless of length.
Prep before words Lock the audience and single goal before writing any dialogue or narration.
Match format to project Use AV two-column for corporate work, single-column for talking-heads, screenplay for narrative shorts.
Test before shooting Run a table read with at least four people and time the script against platform targets.
Consider Webtechs Webtechs handles script development, shoot direction, and post-production for Scottsdale video projects as one coordinated service.

Table of Contents

Why Video Scriptwriting Matters Before You Shoot Anything

Skipping the script feels faster. It isn’t. A director without a script has to invent blocking on the spot, an editor without a script has to guess which take matches the intended line, and an actor without a script improvises tone that may not match the brand or the assignment. Ambiguity on set costs money in every direction, and it costs more in student productions where you can’t just call the crew back tomorrow.

Different formats lean on scripts differently:

  • Social clips need a script to lock the hook before the crew wastes a shoot day on footage nobody watches past second three.
  • Explainer videos need a script to sequence complex ideas into a chain the viewer can actually follow without pausing.
  • Training videos need a script to guarantee consistency across every module, so employee number 40 gets the same instruction as employee number one.
  • Corporate messaging needs a script because legal, marketing, and leadership all want approval before a camera rolls, not after.

The return shows up in three places: fewer reshoots because everyone agreed on the line beforehand, faster edits because the editor is matching footage to a document instead of reconstructing intent, and sharper calls to action because the “ask” was decided in preproduction instead of improvised on the last day of the shoot.

Point Details
Ambiguity is expensive Undirected shoots generate footage that doesn’t match anyone’s expectation, which means reshoots.
Format changes the stakes Social clips live or die on the hook; training videos live or die on consistency.
ROI is measurable Scripted productions cut editing time because footage maps directly to a document.

What Is the Video Script Spine and How Do You Time It?

The canonical script spine, Hook → Promise → Payoff → Ask, scales from a 15 second ad to a 10 minute tutorial without changing shape. Each piece does one job:

  • Hook stops the scroll or the channel-flip. It states the stakes or the payoff immediately.
  • Promise tells the viewer what they’ll get if they keep watching.
  • Payoff delivers on that promise, usually in several smaller beats rather than one long block.
  • Ask tells the viewer exactly what to do next.

Timing on the hook isn’t a suggestion. Short-form video structure guidance puts the hook window at 5 to 15 seconds, and shorter formats need it closer to the 5 second end. Wait past that window and a large share of your audience is already gone.

Length targets follow platform behavior more than personal preference:

Format Target length
Social/Reels/TikTok Short videos around one minute
YouTube tutorial/explainer Several minutes long explainer videos
Corporate/training module Moderate length corporate or training videos

Structure the payoff as a chain of small open loops rather than one continuous explanation. Open a question, close it, open the next one. That rhythm is what keeps a five minute explainer from feeling like a lecture, and it’s the same technique that keeps a 60 second ad from feeling rushed even though it’s covering three ideas in one breath.

Which Script Format Should You Actually Use?

Format choice depends on what you’re shooting, not personal habit. The AV two-column format is the industry standard for corporate and commercial work because it forces audio and visual cues into horizontal alignment, so an editor never has to guess which shot pairs with which line.

AV two-column puts narration or dialogue on one side and visual/graphic cues on the other, row by row. Single-column or master-scene format works for talking-heads content, vlogs, and interviews where there’s no tight sync requirement between picture and audio. A dedicated screenplay format, complete with sluglines and character blocks, belongs to narrative short films where you’re directing actors through scenes rather than delivering information.

Producers expect specific formatting conventions no matter the format: slugines that mark location and time, centered dialogue blocks, and clearly labeled GFX and SFX cues. A cleanly formatted script functions as a quick credibility check on set; it signals to a director within seconds whether the writer has done this before.

A stripped-down AV sample looks like this:

Visual Audio
Wide shot, storefront exterior, morning light NARRATOR: Every business in Scottsdale competes for the same three seconds of attention.
Cut to interior, close-up on hands typing NARRATOR: Here’s how the ones that win actually do it.

For tools, a shared Google Docs file with a two-column table handles most AV drafts and lets stakeholders comment in real time. Screenplay projects belong in Final Draft or Celtx, which auto-format sluglines, dialogue, and action lines so you’re not fighting tab stops during a rewrite.

How Do Professionals Actually Write a Script Step by Step?

The order matters more than most beginners assume. Practitioner workflow runs Prep → Structure → Words → Revision, and skipping straight to Words is the single most common mistake among first-time scriptwriters.

  1. Prep. Define the audience, one clear goal, and a success metric before typing a sentence. If you can’t state the single action you want the viewer to take, you’re not ready to write.
  2. Structure. Build the spine, then break the payoff into three to five distinct sections, each one a small open-and-close loop.
  3. Words. Write for the ear. Use contractions, short sentences, and intentional repetition, the same techniques copywriters use to keep spoken language easy to follow without a page to scan back over. Add on-screen visual cues as you go rather than after the fact.
  4. Revision. Run a table read. Cut any line that doesn’t earn its place. Bring in one person outside the project as an audience proxy, and ask them specific questions rather than “does this work?”

Producers who’ve run this process repeatedly estimate the actual written words represent roughly the final 10 percent of the effort; the prep decisions about audience and goal drive the other 90.

Pro Tip: Read your script out loud before you touch a camera. If you stumble on a line twice, a voice-over artist will stumble on it three times, and an editor will end up cutting around it.

Hands holding script in recording studio

How Do You Time a Script Without Guessing?

The page-to-minute rule holds up in practice: one double-spaced page runs about one minute, and social scripts commonly land at 50 to 150 words for a 15 to 60 second video. That gives you a math check before you ever pick up a camera.

  • Read the script aloud at a natural speaking pace and time it with a phone stopwatch.
  • Run a words-per-minute calculation, roughly 130 to 150 spoken words per minute for conversational narration, to sanity-check your page count.
  • Do a second timer pass after revision, since cutting even three lines can shift a script from 62 seconds to 47.
  • Time the hook separately. If it runs past 15 seconds on a short-form piece, cut it regardless of how good the line sounds.

Guessing at length is how a “quick 30 second ad” turns into a 58 second cut that gets throttled by a platform’s algorithm before it ever reaches the audience it was written for.

Which Tools Fit Each Stage of the Scriptwriting Process?

Different stages call for different software, and using the wrong one slows you down without you noticing.

  • Google Docs handles drafting and collaboration best. A shared two-column table lets a client or professor leave comments directly on the line in question, and insight from working scriptwriters confirms this simple table setup covers most marketing and corporate scripts without needing dedicated software at all.
  • Final Draft and Celtx handle screenplay formatting for narrative shorts, auto-generating sluglines, character cues, and dialogue blocks so you’re writing story instead of fighting margins.
  • StudioBinder picks up where the script leaves off, turning an AV script into a shot-by-shot production breakdown that a director or DP can shoot from directly.
  • TechSmith offers free downloadable script templates, including the A.A.A.A. formula, which is a solid on-ramp if you’ve never structured a script before.

None of these tools write the script for you. AI scaffolding tools can help sketch a hook or rough out beats, but the revision pass and the human decision about audience and goal still fall entirely on you.

What Mistakes Kill Video Scripts and How Do You Fix Them?

“Written for the eye, not the ear” is the single most common flaw in beginner scripts. Sentences that read fine on a page turn clunky the moment an actor tries to say them out loud.

The fixes are specific, not vague advice:

  • Mistake: writing an essay instead of a script. Fix: read every line aloud during revision and cut any sentence that trips your tongue.
  • Mistake: no single goal. Fix: name the one measurable action you want the viewer to take, then delete anything, however clever, that doesn’t serve it.
  • Mistake: under-formatting audio and visual cues. Fix: switch to a two-column AV layout so image and sound stay locked together for the editor.

Before: “Our company has been providing exceptional customer service for over fifteen years, which has allowed us to build a strong reputation.” That’s 22 words a narrator will trip over.

After: “Fifteen years. Zero shortcuts. That’s how we built our name.” Same idea, half the words, and it actually sounds like a person talking.

Three Ready-to-Use Script Templates You Can Fill In Today

Templates work because they force you to hit a word count before you second-guess the writing.

  1. 15 second ad (35 to 40 words). Hook in the first 5 words. Promise in the next 10. Payoff in 15. Ask in the final 5. Example structure: “Tired of X? [hook] Here’s the fix. [promise] It takes 30 seconds and costs nothing. [payoff] Tap the link now. [ask]”
  2. 60 second social explainer (100 to 130 words). Open on a question or bold claim (5 seconds), deliver three quick payoff beats with a visual cue for each, close on a direct ask with on-screen text reinforcing it.
  3. 3 minute how-to (400 to 450 words). Hook in the first 10 seconds, promise the outcome, then break the payoff into three sections of roughly 100 words each, one per step or idea, closing with a clear ask and a recap line.
Template Word count target Runtime Structure
15s ad 35 to 40 words 15 seconds Hook, promise, payoff, ask
60s social explainer 100 to 130 words 60 seconds Hook, 3 payoff beats, ask
3-minute how-to 400 to 450 words 3 minutes Hook, 3 payoff sections, ask

How Do You Test a Script Before You Shoot It?

A table read catches problems a silent read never will. Bring at minimum the writer, the director, the editor, and one person who represents the target audience and has no stake in the project’s ego.

  • Read the full script aloud in real time, at the pace it will actually be delivered on camera.
  • Check whether the hook genuinely holds attention in the first 15 seconds or just reads that way on paper.
  • Confirm the payoff delivers what the promise set up, and that the ask is unmistakable.
  • Deliver the final file as a labeled AV document, a locked PDF, and, for anything with tight timing, a time-coded version the editor can cut against directly.

Pro Tip: When you send a script for feedback, ask three specific questions instead of “thoughts?”: Does the hook make you want to keep watching? Is the ask clear? Is there a line you’d cut?

How Webtechs Approaches Video Scriptwriting for Scottsdale Productions

Every script Webtechs builds for a Scottsdale client runs through the same Prep → Structure → Words → Revision workflow covered above, because it’s the process that consistently produces footage that matches the plan instead of footage the editor has to rescue. Prep means sitting down with a business owner and pinning one goal, whether that’s more phone calls, more foot traffic, or more form submissions, before a single line gets written. Structure means mapping the spine against the actual runtime the client needs for their ad placement or landing page. The pattern shows up across other Webtechs work too, including measurable content outcomes where a coordinated script and content plan produced results the client could actually point to. That same discipline is what goes into every video production project Webtechs builds for local clients.

Skip the Learning Curve: Webtechs Video Production in Scottsdale

Webtechs is the alternative to hiring a freelance scriptwriter and a separate production crew for Scottsdale businesses that want one team handling the script, the shoot, and the edit under a single point of contact.

Webtechs

You now know the spine, the formats, and the timing math. Applying all of it correctly while also running a shoot, directing talent, and managing post-production is a different skill set entirely, and it’s exactly what Webtechs handles for Scottsdale clients from first draft to final cut. The deliverables cover script development in proper AV format, on-set shoot direction, and a full post-production handoff with time-coded files your website or ad platform can use immediately. Because the same team writes the script and shoots the footage, there’s no gap where a freelancer’s script doesn’t match what the crew can actually deliver on budget.

Browse the Webtechs portfolio to see finished Scottsdale video work, then reach out to scope a script-to-screen project for your business.

Frequently Asked Questions

How long is a 2 hour film script?
A feature-length script running 2 hours typically lands around 120 pages, following the one-page-per-minute standard used throughout the film industry. That’s a rough guideline, not a hard rule. Pacing, amount of dialogue, and genre all shift the actual runtime somewhat, but 120 pages remains the benchmark screenwriters and readers use to estimate a feature’s length before it’s shot.

Is screenwriting being replaced by AI?
No. AI tools are useful for scaffolding, generating rough hook ideas or beat outlines quickly, but the core decisions about audience, goal, and revision still require a human writer. AI can draft a first pass; it can’t sit in a table read and tell you which line actually lands.

Will Netflix buy my script?
Streaming platforms and studios acquire scripts through agents, managers, and established industry relationships far more often than through unsolicited submissions. Building a portfolio of produced short-form work, entering recognized screenwriting competitions, and querying literary agents are the realistic paths toward that kind of sale, not a cold submission to a streamer’s inbox.

Does screenwriting pay well?
Pay varies enormously by project type, experience level, and whether you’re working under a union contract like the Writers Guild of America versus freelance corporate or commercial script work. Beginners often start with lower-paying corporate, social, or freelance projects to build a reel before moving into higher-paying narrative or studio work. Consistent income in screenwriting typically comes after building a track record, not from a single script sale.

Frequently Asked Questions — overview diagram

Sources

A handful of resources are worth bookmarking as you build out your own script library.

Hands optimizing website images manually
Written by webtechs

Page Speed Optimization for Scottsdale Businesses

Hands optimizing website images manually

For most Scottsdale small businesses, Webtechs is the recommended local starting point. Request a free Core Web Vitals audit using PageSpeed Insights as the baseline, and ask for a written report before any work begins.

Here is what a solid free audit should include:

  • Baseline score from PageSpeed Insights (both mobile and desktop)
  • Core Web Vitals report covering LCP, CLS, and INP with current field data
  • Prioritized fix list with estimated impact per item
  • Expected turnaround stated upfront (typically 1–3 weeks for a focused engagement)

Three local options worth contacting for quotes:

  • Webtechs (recommended): full-service SEO and web agency with local Scottsdale experience, Core Web Vitals audits, WordPress expertise, and hosting options
  • Scottsdale WordPress specialist: best for sites built on WordPress needing plugin/theme cleanup and caching configuration
  • Scottsdale general-site specialist: best for non-WordPress CMS or custom-built sites needing server-side and CDN work

Key Takeaways

For Scottsdale small businesses, page speed optimization starts with a free Core Web Vitals audit, a prioritized fix list, and a provider who tests on mobile under real-world conditions.

Point Details
Start with a free audit Request a PageSpeed Insights baseline covering both mobile and desktop before any work begins.
Core Web Vitals are the target Aim for LCP under 2.5 seconds and INP under 200 ms, these are the metrics Google uses.
Mobile-first for Scottsdale Most local searches come from phones; always require throttled mobile testing in the proposal.
Require monitoring post-launch Speed degrades as plugins update and content grows — a one-off fix without monitoring won’t hold.
Webtechs is the local starting point Free diagnostic, Core Web Vitals audit, WordPress expertise, and hosting options for Scottsdale businesses.

Table of Contents

How do Scottsdale page speed providers compare?

Before you call anyone, a side-by-side look at what each type of local provider typically offers helps you ask the right questions.

Webtechs WordPress Specialist General-Site Specialist
Best for Small businesses wanting bundled SEO + speed + hosting WordPress sites needing plugin/theme cleanup Custom CMS or non-WordPress sites
Services included Audit, Core Web Vitals fixes, image optimization, caching, CDN, hosting, monitoring Plugin audit, caching plugin setup, image optimization, theme cleanup Server tuning, CDN, JS/CSS optimization, third-party script management
Pricing model Project-based or monthly retainer; free diagnostic available Project-based; quote after audit Project-based; quote after audit
Typical turnaround 1–3 weeks for initial fixes 1–2 weeks 2–4 weeks
Support & maintenance Ongoing retainer with monitoring options One-off fix or short retainer One-off fix
Local trust signals Google reviews, local case studies, client testimonials Google Places rating Google Places rating

Comparison chart of Scottsdale page speed providers

Quick pros and cons:

Webtechs:

  • Pros: one vendor handles speed, SEO, hosting, and content; local Scottsdale team; free diagnostic
  • Cons: broader scope means you pay for services you may not need immediately

WordPress specialist:

  • Pros: deep plugin/theme knowledge; fast turnaround on WordPress-specific issues
  • Cons: limited help if your bottleneck is server-side or CDN-related

General-site specialist:

  • Pros: strong on infrastructure and custom builds
  • Cons: less familiar with WordPress quirks; longer timelines

How to request a quote from any provider:

  1. Run your site through PageSpeed Insights and save the report as a PDF.
  2. Note your top three highest-traffic pages — those are the ones that matter most.
  3. Share CMS access details (WordPress admin or hosting panel) so the provider can audit plugins and server config.
  4. Ask for a written scope of work listing every fix, not just a promised score.

What does page speed optimization actually include?

A professional engagement covers more ground than most owners expect. The standard deliverables on a well-scoped project look like this:

  • Full performance audit (lab and field data)
  • Core Web Vitals tuning: LCP, CLS, and INP
  • Image compression and conversion to next-gen formats (WebP, AVIF)
  • Browser and server-side caching configuration
  • CDN implementation
  • JavaScript and CSS minification and deferral
  • Font optimization (subsetting, preloading)
  • Third-party script management (tag managers, chat widgets, analytics)
  • Server/hosting improvements and TTFB reduction
  • WordPress-specific fixes: plugin audit, theme cleanup, caching plugin configuration
  • Testing and monitoring setup
  • Final report with before/after metrics

Core Web Vitals defined:

Stat worth knowing: A healthy server response time (TTFB) sits under 200 ms. If your TTFB runs higher than that consistently, no amount of frontend work will fully fix your load time — the server bottleneck has to come first.

A typical Scottsdale small-business WordPress site, after a focused engagement, often sees LCP drop into the target zone under 2.5 seconds and mobile PageSpeed scores climb noticeably. Results vary by site complexity, hosting quality, and how many third-party scripts are running. Faster pages also convert better, which is the business case beyond the SEO benefit.

Measurement uses both synthetic tests (PageSpeed Insights, WebPageTest) and real-user data from the Chrome UX Report. Lab scores tell you what’s possible; field data tells you what real visitors actually experience. A good provider reports both.


How do you choose the right Scottsdale provider?

Work through this checklist before signing anything.

  1. Ask for a sample audit report from a previous client (redacted is fine). If they can’t produce one, walk away.
  2. Confirm they test mobile under throttled conditions, not just desktop on a fast connection. Real Scottsdale customers search on phones.
  3. Request before/after Core Web Vitals metrics from a comparable project, not just a PageSpeed score.
  4. Verify WordPress experience if your site runs on WordPress — ask specifically about caching plugins and plugin conflict resolution.
  5. Confirm monitoring is part of the plan. Speed degrades over time as plugins update and content grows. A one-off fix without monitoring is a short-term solution.
  6. Check Google Places ratings and recent reviews — look for mentions of communication and follow-through, not just technical skill.

Interview questions to ask on the sales call:

  • What is my current TTFB, and is it a bottleneck?
  • Will you test on a mid-tier mobile connection, or only on fast broadband?
  • What field data do you pull, and from which tool?
  • What does your monitoring setup look like after the initial fix?
  • What happens if scores drop three months after you finish?

Red flags:

  • Promising a “100% PageSpeed score” — chasing a perfect lab score often misses what real users experience
  • No mention of Core Web Vitals or field data in the proposal
  • Inability to explain the difference between LCP and TTFB
  • No maintenance or monitoring plan offered

Pro Tip: Ask every vendor: “What’s my TTFB right now?” A provider who can answer that in the first call has already done more homework than most.

Local trust signals that carry real weight: a verified Google Business Profile with recent reviews, a free diagnostic offer, and a written SLA covering response time if performance drops post-launch. Webtechs checks those boxes for Scottsdale businesses, and you can review local SEO work and results before committing.


How do you choose the right Scottsdale provider? — overview diagram

What Scottsdale businesses should prioritize first

Most Scottsdale small-business sites share the same pattern: a WordPress install, a page-builder theme, a handful of plugins that have never been audited, and images uploaded straight from a phone or camera. That combination alone accounts for the majority of slow load times.

Start with the quick wins. Image compression and conversion to WebP, enabling caching, and removing or replacing heavy plugins costs the least time and money and delivers the biggest LCP improvement. Many sites drop a full second off load time from image optimization alone.

The middle tier, CDN implementation and lazy-loading third-party scripts like chat widgets and social embeds, matters more than most owners realize. Those scripts can add noticeable delay to mobile load time, and mobile is where most local Scottsdale searches land. If your site targets customers in the Scottsdale area, assume the majority of your traffic arrives on a phone, not a desktop.

Infrastructure fixes, hosting upgrades, server-side caching at the edge, and DNS improvements, come last. They require more coordination and cost, but they’re unavoidable if TTFB is the root problem. Fix the frontend first, measure again, then decide whether the server needs attention.

One practical example: a Scottsdale service business that prioritized its contact and services pages over the homepage saw bounce rate fall and contact form submissions climb after a focused two-week engagement. The homepage looked great but drove almost no conversions. The pages that drove calls were the ones worth fixing first.

Speed is not a one-time project. Plan for periodic audits and ongoing monitoring, because every plugin update and new content block is a potential regression.


Webtechs handles page speed for Scottsdale businesses

Webtechs has worked with Scottsdale small businesses since 1997. For page speed, the engagement starts with a free diagnostic, includes a full Core Web Vitals audit, and delivers a prioritized fix list before any work begins.

Webtechs

What Webtechs delivers for site speed:

  • Free diagnostic with PageSpeed Insights baseline (mobile and desktop)
  • Core Web Vitals audit covering LCP, CLS, and INP
  • Image optimization, caching, CDN setup, and JS/CSS cleanup
  • WordPress-specific fixes: plugin audit, theme cleanup, caching plugin configuration
  • Hosting and managed hosting options for ongoing performance
  • Monitoring and retainer options so speed holds after launch

Local businesses can review past Scottsdale work in the portfolio before reaching out. The next step is straightforward: request a free audit, get the Core Web Vitals baseline in writing, and review the prioritized fix list before committing to a project scope.


Sources

0
Hands configuring network and server backend
Written by webtechs

How to Stop Contact Form Spam: A Practical 2026 Guide

Hands configuring network and server backend

The fastest reliable way to stop contact form spam is a layered, invisible stack. You don’t need to force users through a puzzle or a blurry image grid. The combination of a honeypot field, server-side rate limiting, and a server-validated invisible verification token blocks the overwhelming majority of automated and human-assisted spam with zero visible friction for legitimate visitors.

Start here:

  • Add a hidden honeypot field to your form and check it server-side before processing anything.
  • Set a server-side timestamp at page load and reject submissions that arrive faster than a human can type.
  • Enable edge-level rate limiting on your POST endpoint (Cloudflare’s free tier covers this).
  • Integrate an invisible verification widget — Cloudflare Turnstile is the lowest-friction option — and validate the token on your server, never just on the client.
  • Route suspicious submissions to a quarantine folder rather than deleting them outright.

That five-step baseline handles most spam waves without a single visible CAPTCHA. For high-volume forms or persistent targeted attacks, you add a classifier like Akismet on top. The rest of this guide explains how to implement each layer, tune thresholds, and avoid blocking real leads.

Key Takeaways

A layered, invisible defense stack — honeypot, edge rate limiting, server-validated invisible verification, and a classifier — is the most reliable way to stop contact form spam without harming conversion.

Point Details
Start with honeypot and time check These two zero-cost measures stop the majority of dumb automated bots with no user friction.
Validate tokens server-side A token in the form field proves nothing; your server must verify it with the provider’s API before processing.
Rate limit at the edge Cloudflare rate-limit rules drop POST floods before they reach your application server.
Score, don’t hard-block Combine signals into a score and route by range; keyword blocks alone cause false positives and lost leads.
Webtechs implements the full stack Webtechs handles form hardening, WAF rules, classifier integration, and a 7-day observation window for Arizona businesses.

Table of Contents

What should you deploy first to prevent contact form spam?

Priority matters when your time is limited. Deploy in this order, and you’ll get the most protection per hour of work.

  1. Honeypot field plus server-side time check. This is the cheapest, highest-return move. A hidden field that bots fill and humans ignore, combined with a submission timestamp check, stops the majority of dumb crawlers instantly. No third-party dependency, no API call, no cost.
  2. Per-IP rate limiting at the edge. Before a flood of POST requests ever touches your application server, your CDN or edge provider drops them. Cloudflare’s guidance recommends setting rate limits at the edge and observing baseline traffic before locking in thresholds. Start conservative, then tighten.
  3. Server-validated invisible verification. Add Cloudflare Turnstile or reCAPTCHA v3. The widget runs silently in the background, issues a token, and your server verifies that token before accepting the submission. Client-side token presence alone proves nothing.
  4. AI classifier or anti-spam service. For forms that still get hit after steps 1–3, route submissions through a service like Akismet or a custom classifier. Score the message content and metadata, then accept, quarantine, or discard based on the score.
  5. Quarantine routing as a fallback. Never hard-delete flagged submissions during the first few weeks of a new rule set. Route them to a separate inbox or database table and review a sample daily. You’ll catch false positives before they cost you a real lead.

Splitforms’ comparative testing confirms that each method covers a different attack surface, which is exactly why layering beats any single solution.

Which invisible verification tool should you use?

Invisible verification works by analyzing behavioral signals — mouse movement, timing patterns, network telemetry, browser fingerprints — and issuing a signed token when the visitor passes. Your server exchanges that token with the provider’s API to confirm it’s valid before processing the form. The key word is server. A token sitting in a hidden form field proves nothing until your backend verifies it.

Cloudflare Turnstile

Turnstile runs entirely invisibly for most users. It doesn’t harvest browsing data for ad targeting, which makes it the cleanest option for GDPR-conscious sites. The widget loads from Cloudflare’s edge, so it’s fast, and the free tier has no submission cap. For Arizona-based small businesses that don’t want to manage privacy disclosures around Google’s data practices, Turnstile is the default recommendation.

reCAPTCHA v3

Google’s reCAPTCHA v3 scores every visitor from 0.0 to 1.0 and returns that score to your server. You decide the threshold. The tradeoff: Google uses the behavioral data across its network, which raises GDPR and CCPA questions. It’s also invisible by default, but low-scoring submissions need a fallback strategy — either a visible challenge or a quarantine route.

hCaptcha

hCaptcha sits between Turnstile and reCAPTCHA in terms of privacy. It offers a paid privacy-first mode and a free tier that shows visible challenges to lower-confidence visitors. The visible challenge is the friction point most sites want to avoid.

Pro Tip: Reserve visible challenges for submissions that score poorly on your server-side risk assessment. Showing a puzzle to every visitor is a conversion tax you don’t need to pay.

Server-side validation pseudocode for any of these tools follows the same pattern:

token = POST_body["cf-turnstile-response"]  // or g-recaptcha-response
result = HTTP_POST(provider_verify_endpoint, {secret: SERVER_SECRET, response: token})
if result.success == false OR result.score < threshold:
    return quarantine_or_reject()
proceed_with_submission()

Never skip that API call. Attackers send POST requests directly to your endpoint with no widget interaction at all, so a missing or invalid token must be a hard stop.

How do anti-spam services like Akismet fit into your pipeline?

Anti-spam classifiers run on the server after you’ve already passed the token and honeypot checks. They analyze the actual content of the submission — the message text, the name field, the email address, the IP — and return a spam probability score. That score feeds your routing logic.

The integration flow looks like this:

  • Collect the verified submission (token valid, honeypot empty, timestamp reasonable).
  • Send the message body, sender metadata, and IP to the classifier API.
  • Read the response: spam score, spam flag, or category label depending on the service.
  • Route: score below threshold goes to your inbox, borderline score goes to quarantine, high score gets silently discarded or logged.

Akismet is the most common integration for WordPress-based contact forms. It plugs directly into Contact Form 7, WPForms, and Gravity Forms, and it checks submissions against a database of known spam patterns built from millions of WordPress sites. For non-WordPress stacks, Akismet offers a REST API that works with any server-side language.

Where classifiers genuinely shine is content analysis. Rate limits and honeypots catch volume attacks and dumb bots. Classifiers catch the smarter submissions — human-written spam, low-volume targeted campaigns, and content that looks legitimate at the network level but reads as spam in the message body.

A word on privacy: when you send message text to a third-party classifier, you’re transmitting your users’ data to an external server. Review the provider’s data-processing terms before deploying, especially if your site serves EU visitors or operates under CCPA. Akismet’s terms allow data use for spam-detection purposes; confirm that aligns with your privacy policy before going live.

Splitforms’ comparative tests showed that combining an invisible verification layer with a classifier produced the lowest false-positive rate across their test set, better than either method alone.

Why honeypot fields and time checks are still worth using in 2026

A honeypot is a form field that’s hidden from human visitors but visible to bots. You hide it with CSS, not with type="hidden" (bots ignore hidden inputs but often fill visible-but-offscreen fields). When the field contains any value on submission, you know a bot filled it.

Best practices for honeypot implementation:

  • Name the field something bots find attractive: website, url, email2, phone2.
  • Hide it with CSS: position: absolute; left: -9999px; or display: none with an additional aria-hidden="true".
  • Add tabindex="-1" and autocomplete="off" so screen readers and autofill tools skip it.
  • Check the field value server-side, not in JavaScript. Client-side checks are trivially bypassed.

Time-to-submit checks work by storing a server-generated timestamp in a hidden field (or in a session variable) when the form page loads. On submission, you compare the current time to that timestamp. Submissions arriving in under three seconds are almost certainly automated. A threshold of 5–8 seconds catches most bots while still accommodating fast human typists.

The server response when a honeypot fires matters. Return a 200 OK with a fake success message — “Thanks, we’ll be in touch” — rather than an error. An error response tells the bot it was caught, which can trigger the attacker to adapt their approach. A silent fake success keeps the trap effective longer.

Pro Tip: Headless browsers like Puppeteer can be scripted to wait before submitting, defeating naive time checks. Combine the time check with at least one other signal — honeypot, token verification, or IP reputation — so no single bypass defeats your whole stack.

ShipMyForm’s 2026 guide recommends honeypot plus server-side rate limiting as the primary defense for most sites, with Turnstile added only when a form is actively under attack. That’s a sensible triage order.

One accessibility note: some browser extensions and assistive tools can inadvertently populate hidden fields. If you see a spike in false positives from legitimate users, check whether a popular autofill extension is the culprit before tightening your honeypot logic.

How do rate limiting and WAF rules stop mass POST floods?

Edge-level rate limiting is your first line of defense against volume attacks. It drops excess requests at the CDN before they reach your application server, which means your server never pays the processing cost of a flood.

A practical Cloudflare rate-limit rule for a contact form endpoint:

  • Expression: (http.request.method eq "POST") and (http.request.uri.path eq "/contact")
  • Threshold: 5 requests per IP per 10 minutes (adjust based on your baseline traffic)
  • Action: Block for 1 hour on breach
  • Mitigation: Log all blocked requests to your security dashboard

Cloudflare’s documentation recommends observing real traffic for at least a few days before setting hard thresholds, so you don’t accidentally block a legitimate user who refreshes the page after a network error.

Beyond rate limiting, WAF rules catch targeted attack patterns:

Rule type What it catches Cloudflare action
SQLi / XSS detection Injection strings in form fields Block or challenge
Anomalous User-Agent Missing or bot-signature UA headers Block
High request rate from single ASN Distributed bot networks Rate limit or CAPTCHA
Known bad IP reputation IPs on threat intelligence lists Block

Cloudflare’s Bot Fight Mode (available on the free plan) handles a significant portion of automated traffic automatically. For website security beyond the basics, the Pro plan’s WAF managed ruleset adds pre-built rules for common attack patterns without requiring you to write expressions from scratch.

Monitoring is what makes rate limiting useful over time. Watch your security events dashboard for:

  • Sudden spikes in blocked POST requests (may signal a new campaign targeting your form).
  • Geo-specific waves (a burst from a single country or ASN often indicates a coordinated attack).
  • False-positive patterns (legitimate users hitting the rate limit, which shows up as a spike in support contacts or form abandonment).

Tune thresholds monthly for the first three months, then quarterly once traffic patterns stabilize.

Why client-side tricks alone will never be enough

Any protection that runs only in the browser can be bypassed by sending an HTTP POST directly to your endpoint. An attacker doesn’t need to load your page, execute your JavaScript, or interact with your widget. They just need your form’s action URL and field names, both of which are visible in your page source.

Common bypass techniques:

  • Direct POST with curl or Python’s requests library, skipping the page entirely.
  • Headless browser automation (Puppeteer, Playwright) that executes JavaScript but can be scripted to wait, fill fields, and submit programmatically.
  • Token replay attacks, where a valid token from one session is reused in bulk submissions (server-side token validation with single-use enforcement prevents this).

Your server-side validation checklist, in order:

  • Verify the invisible verification token against the provider’s API. Reject if invalid or missing.
  • Check the honeypot field. Reject if populated.
  • Validate the submission timestamp. Reject if under your minimum threshold.
  • Check IP rate-limit state. Reject if the IP has exceeded your threshold in the current window.
  • Score the content with your classifier. Route by score.
  • Log every rejection with timestamp, IP, User-Agent, and the reason for rejection.

Never trust a flag sent from the client. If your JavaScript sets a hidden field like is_human=true and your server checks that field, an attacker sets it too. Every signal that matters must be generated or verified server-side. Client-sent flags are decoration, not security.

Logging rejected attempts is not optional. Without logs, you can’t tell whether your rules are catching real attacks or blocking real users. A week of rejection logs will show you patterns you’d never guess from theory alone.

Build a scoring system instead of hard keyword blocks

Hard keyword blocks — rejecting any submission containing “casino,” “SEO services,” or a free email domain — cause false positives constantly. A legitimate prospect from Gmail gets blocked. A spammer who avoids your keyword list gets through. Scoring is more accurate and more forgiving.

Build a score from multiple signals and route by the total:

  1. Honeypot populated: add 100 points (automatic quarantine or discard).
  2. Submission time under 5 seconds: add 40 points.
  3. Token verification failed: add 80 points.
  4. IP on a reputation blocklist: add 30 points.
  5. Keyword pattern match (commercial anchor text, pharmaceutical terms, etc.): add 10–20 points per match.
  6. Duplicate submission (same content or IP within 10 minutes): add 50 points.
  7. Behavioral score from invisible verification below threshold: add 20–40 points.

Route by total score:

  • 0–29: Accept and deliver to inbox.
  • 30–69: Quarantine for manual review.
  • 70+: Silent discard (return fake success).

Keyword and email-domain patterns belong in this scoring system as soft signals, not as standalone hard blocks. A submission from a free email address with a short message and a fast submission time is suspicious. The same email address with a long, coherent message and a normal submission time is probably fine.

Pro Tip: Log scores and sample every submission in the 30–69 quarantine range for the first week after you deploy new rules. You’ll find the threshold that separates real borderline cases from obvious spam, and you can adjust the score weights accordingly before tightening anything.

Splitforms’ 2026 guide positions this kind of multi-signal pipeline as the standard for production form protection, with CAPTCHA as optional for most contact forms.

How do you monitor and test without blocking real submissions?

Testing anti-spam rules without a plan is how you accidentally block a real prospect and never know it. A structured approach catches false positives before they cost you leads.

Testing checklist:

  • Enable new rules on a fraction of traffic first (10–20%) and compare submission quality between the protected and unprotected segments.
  • Log the raw payload of every submission for at least 72 hours after deploying a new rule, including submissions that pass.
  • Sample your quarantine folder daily for the first two weeks. Pull a random 20 submissions and read them. You’ll know within a few days whether your thresholds are calibrated.
  • Send test submissions from your own IP at different speeds and with different content to verify each rule fires correctly.

Fields to log for every submission:

  • Timestamp (server-side, not client-reported)
  • IP address and ASN
  • User-Agent string
  • Referrer header
  • Token verification result (pass/fail + score if available)
  • Honeypot field value (empty or populated)
  • Submission time delta (seconds since page load)
  • Total spam score
  • Routing decision (accepted/quarantined/discarded)

Review cadence:

  1. Daily for the first two weeks after any rule change.
  2. Weekly for the following month.
  3. Monthly once the rule set is stable.

Set up an alert for any 10-minute window where blocked POST requests exceed three times your daily average rate. That spike pattern almost always signals a new attack campaign, and catching it early lets you tighten rules before your inbox fills up.

For sites built on JavaScript frameworks (React, Vue, Next.js), the same server-side principles apply. Your API route or serverless function handles the token verification, honeypot check, and rate-limit logic. The client-side widget loads asynchronously and submits the token as part of the form payload. Nothing about the invisible verification flow changes because the frontend is a SPA.

Step-by-step implementation checklist for your contact form

Follow this sequence and you’ll have a production-ready layered defense without skipping a critical step.

  1. Add the honeypot field and timestamp check. Deploy server-side. Test by submitting the form with the honeypot field populated and confirm you get a fake success response, not an error.
  2. Set up edge rate limiting. In Cloudflare (or your CDN), create a rate-limit rule targeting POST requests to your form endpoint. Start at 10 requests per IP per 10 minutes. Observe for 48 hours before tightening.
  3. Integrate Cloudflare Turnstile. Add the widget script to your form page. Add the token field to your form. Add server-side token verification to your form handler. Confirm the handler rejects submissions with missing or invalid tokens.
  4. Connect your classifier. For WordPress: install Akismet and configure your API key. For custom stacks: integrate the Akismet REST API or an equivalent classifier. Test with known spam content and confirm it routes to quarantine.
  5. Implement the scoring system. Assign weights to each signal. Set your accept/quarantine/discard thresholds. Log every score.
  6. Set up quarantine routing. Route 30–69 scored submissions to a separate database table or email folder. Never delete them automatically during the first 30 days.
  7. Enable WAF managed rules. In Cloudflare, turn on the managed ruleset for your plan tier. Review the default rule actions and switch any “block” rules to “log” for the first week to catch false positives.
  8. Run a 7-day observation window. Review logs daily. Sample quarantine. Adjust score weights and rate-limit thresholds based on what you see.
  9. Document your rollback plan. Know exactly which rules to disable if a false-positive wave hits. A rollback should take under five minutes.
  10. Schedule a monthly review. Spam tactics evolve. A rule set that works in January may need tuning by March.

Pro Tip: Webtechs validates each configuration step against live traffic before handing off to the client. The 7-day observation window isn’t optional — it’s where you find the edge cases your test environment never showed you.

FormPlume’s documentation also recommends MX record validation and disposable-address detection as additional signals during the classifier step, which can catch human spammers using throwaway addresses.

The case for invisible, server-validated stacks over visible CAPTCHAs

The conventional advice for years was “add a CAPTCHA.” It’s still the first thing many tutorials recommend, and it’s usually the wrong first move.

Visible CAPTCHAs do block bots. They also block real people. A distorted text puzzle or a grid of traffic lights adds friction at exactly the moment a potential client is deciding whether to contact you. For a local Arizona business where every lead matters, that friction has a real cost. The conversion impact of a visible CAPTCHA on a contact form is not trivial, and it’s rarely offset by the marginal spam reduction over a well-tuned invisible stack.

The invisible approach scales better for another reason: it doesn’t require you to escalate the user experience to fight harder attacks. When a bot farm gets smarter, you tighten a server-side threshold or add a scoring signal. You don’t force your legitimate users to solve harder puzzles because attackers got better at solving easy ones.

There’s also a maintenance argument. A visible CAPTCHA is a dependency you manage forever. Invisible verification combined with edge rate limits and a classifier is a pipeline you tune quarterly. The tuning is less visible to users, which means you can adjust aggressively without worrying about UX complaints.

The one place visible challenges make sense: a form that’s actively under a targeted human-assisted attack, where behavioral scoring alone isn’t sufficient. That’s a narrow case. For the vast majority of contact forms, the invisible stack handles it.

Webtechs builds and hardens contact forms for Arizona businesses

Spam-proofing a contact form the right way — honeypot, edge rate limits, server-validated Turnstile, classifier integration, and a tuned scoring pipeline — takes time to set up and discipline to maintain. Webtechs handles the full implementation for small and mid-sized businesses across Arizona, from the initial professional web design through to WAF configuration, server-side validation, and the 7-day observation window that catches false positives before they cost you a lead.

Webtechs

The service covers form hardening, Cloudflare WAF and rate-limit rules, token verification endpoints, classifier integration, quarantine routing, and monthly threshold reviews. You get a contact form that blocks spam without adding friction for the real prospects you’re trying to reach. See what that looks like in practice on the Webtechs portfolio, or reach out directly to get a quote for your site.

Sources

Hands planning Google Ads budget on paper
Written by webtechs

Google Ads Cost in 2026: A Small Business Guide

Most U.S. small businesses pay between $0.80 and $9+ per click on Google Ads, with a median CPC of $4.52 and an average CPC of $8.34 across Search campaigns. A practical starter monthly budget for a small business runs $1,000–$2,500, though accounts spending below $1,000/month often generate too little data to optimize effectively.

  • Median CPC (U.S. Search): $4.52
  • Average CPC (U.S. Search): $8.34
  • Recommended starter monthly budget: $1,000–$2,500 for meaningful signal

Pro Tip: Plan for at least 30–90 days before drawing conclusions from a new campaign. Google’s algorithm needs conversion data to optimize, and most accounts don’t produce statistically reliable signals until they’ve logged 30–50 conversions.


Key Takeaways

Google Ads costs for U.S. small businesses typically range from $1,000–$2,500/month to generate meaningful signal, with a median Search CPC of $4.52 and an average of $8.34, and results require at least 30–90 days of consistent data collection before scaling.

Point Details
Median vs. average CPC U.S. Search median CPC is $4.52; average is $8.34. Use the median for conservative budget planning.
Starter monthly budget $1,000–$2,500/month generates enough data for optimization; under $1,000 often under-signals campaigns.
Testing cadence Allow 30–90 days before scaling. Increase budgets in 10–20% increments to avoid resetting the learning phase.
Track before you spend Set up GA4, Google Ads conversion tracking, and call tracking before launching any campaign.
Webtechs starter plan Webtechs provides audit, setup, and 90-day PPC management for small businesses ready to run structured campaigns.

Table of Contents

How Google Ads pricing actually works

Google Ads runs on a real-time auction, not a fixed price list. Every time someone searches, Google holds an instant auction among eligible advertisers, and what you pay depends on your Ad Rank relative to the advertiser below you, not your maximum bid alone.

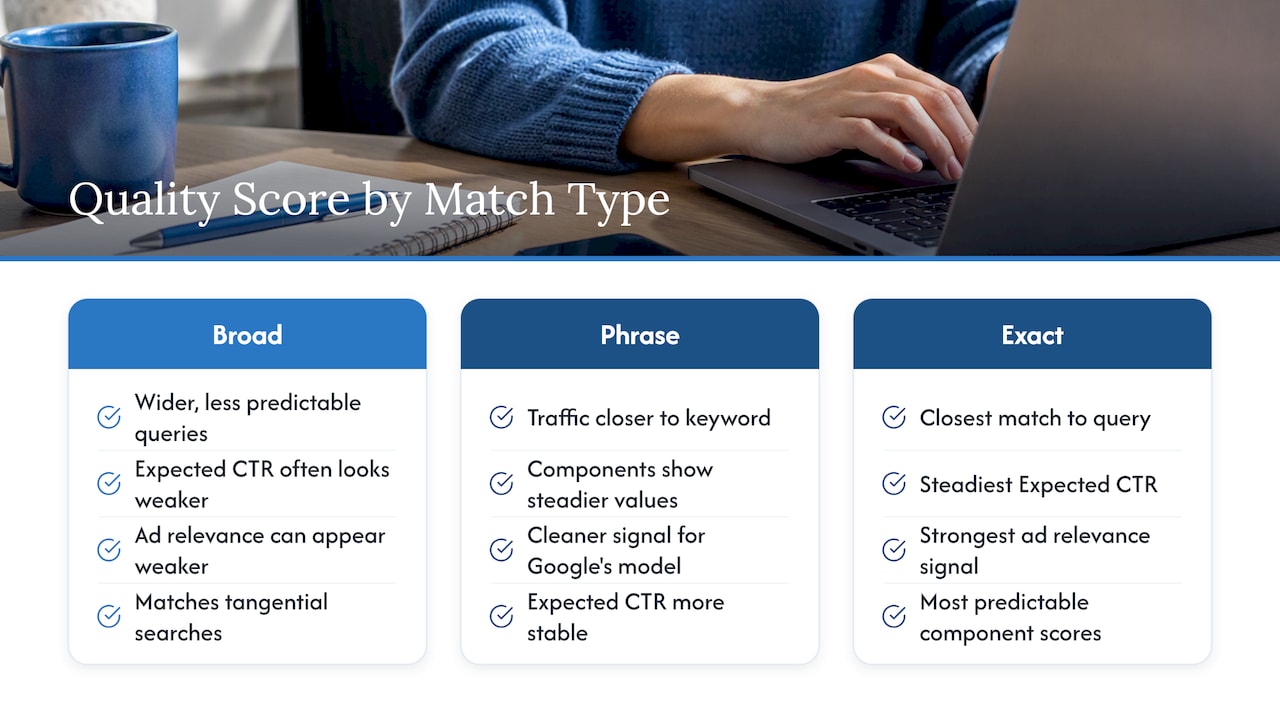
Ad Rank is calculated from your bid, your Quality Score, and the expected impact of your ad extensions. Quality Score itself breaks into three components: expected click-through rate (CTR), ad relevance to the search query, and landing page experience. A higher Quality Score can let you win placements at a lower actual CPC than a competitor bidding more but with a weaker ad.

The actual CPC formula: Actual CPC = (Ad Rank of the advertiser below you / Your Quality Score) + $0.01. In practice, you almost always pay less than your maximum bid.

Pricing models available:

  • Manual CPC: You set the maximum bid per keyword. Full control, but requires active management.
  • Enhanced CPC (eCPC): Google adjusts your manual bids up or down based on conversion likelihood.
  • Maximize Clicks: Automated bidding to get the most clicks within your budget.
  • Target CPA: Google sets bids to hit a target cost per acquisition. Needs conversion history to work well.
  • Target ROAS: Optimizes for return on ad spend. Best for e-commerce with solid conversion data.
  • CPM / vCPM: Cost per thousand impressions, used for Display campaigns when awareness is the goal.
  • CPV: Cost per view, used for YouTube campaigns.

Budget and billing rules (per Google’s official guidance):

  • You pay only when someone clicks or calls, not for impressions on Search.
  • Your monthly spending limit equals your average daily budget × 30.4.
  • Google can spend up to 2× your daily budget on high-traffic days, but your monthly total will never exceed that 30.4 multiplier.
  • There is no activation fee for Google Ads or Smart campaigns.

Pro Tip: For new campaigns with limited conversion history, start with Maximize Clicks or Manual CPC rather than Target CPA. Automated bidding strategies need at least 30–50 conversions per month to function reliably. Forcing Target CPA too early often results in under-delivery or erratic spend.


CPC benchmarks by industry: what the 2026 data shows

The headline numbers are useful, but the range underneath them is what actually matters for planning. Backlinko’s 2025 dataset shows a U.S. Search average CPC of $8.34 and a median of $4.52, meaning a small cluster of expensive keywords in legal, finance, and insurance pulls the average well above what most advertisers actually pay.

Benchmark callout: The average U.S. Search CPC of $8.34 masks a wide spread. Most small businesses in non-legal, non-finance verticals will see actual CPCs closer to the $2–$5 range when targeting long-tail or local keywords. (Source: Backlinko)

These figures are U.S.-focused. In Arizona markets like Phoenix, Scottsdale, and Tucson, local competition in home services and legal can push CPCs toward the higher end of each range, while rural or suburban targeting often lands closer to the median.

Median vs. mean for planning: Use the median as your planning baseline, not the average. A handful of ultra-competitive keywords inflate the mean significantly. When you build your initial keyword list, pull CPC estimates from Google Ads Keyword Planner and compare them to the median for your vertical. If your estimates consistently exceed the average, you’re targeting high-competition terms that may require a larger budget to compete.


How to set a Google Ads budget: worked examples for small businesses

The core formula: Monthly budget = Target customers × (1 / Conversion rate) × CPC.

Simple math, but the inputs require honest estimates.

Three scenarios:

  1. Local service business (e.g., Scottsdale HVAC company)
    Target: 10 new service calls/month. Estimated CPC: $5.50 (home services median).
    Clicks needed: 10 ÷ 0.08 = 125 clicks. Monthly budget: 125 × $5.50 = $687.50. Round up to $750–$1,000/month to account for variance and allow the algorithm room to learn. Daily budget: $1,000 ÷ 30.4 = $32.90/day.

  2. E-commerce small store
    Target: $5,000 in monthly revenue from ads. Average order value: $75. Estimated CPC: $1.50.
    Orders needed: $5,000 ÷ $75 = 67 orders. Clicks needed: 67 ÷ 0.02 = 3,350 clicks. Monthly budget: 3,350 × $1.50 = $5,025. For a test phase, start at $1,000–$1,500/month to validate conversion rates before scaling.

  3. B2B lead generation
    Target: 5 qualified leads/month. Customer lifetime value (LTV): $8,000. Target customer acquisition cost (CAC): $400. Estimated CPC: $7.00.
    Clicks needed: 5 ÷ 0.035 = 143 clicks. Monthly budget: 143 × $7.00 = $1,001. At $400 CAC and $8,000 LTV, this is a 20:1 return. Even doubling the budget to $2,000/month is defensible.

Pacing and testing cadence:

  • Weeks 1–4: Gather data. Resist the urge to optimize aggressively.
  • Weeks 4–12: Identify top-performing keywords and ad groups. Pause underperformers.
  • After 90 days: Scale budgets in 10–20% increments, not all at once. Sudden large increases reset the learning phase.

Pro Tip: Run separate campaigns for branded and non-branded keywords from day one. Branded terms convert at much higher rates and lower CPCs, and mixing them with non-branded terms distorts your CPA data.


What raises Google Ads costs: controllable and uncontrollable factors

Cost per click is not random. The factors driving it split cleanly into things you control and things you don’t.

The top cost drivers:

  • Industry competition: Legal and finance keywords cost more because the revenue per customer is high. You can’t change your industry, but you can target less competitive long-tail terms.
  • Keyword intent: “Emergency plumber Phoenix” costs more than “how to fix a leaky faucet.” High-intent terms convert better but carry a premium.
  • Geographic targeting: Targeting a dense metro like Phoenix costs more per click than targeting a smaller suburb. Narrowing to specific zip codes can reduce CPC while maintaining relevance.
  • Device targeting: Mobile CPCs are often lower than desktop, but conversion rates can differ by industry. Test both before adjusting bids.
  • Quality Score: A Quality Score of 8–10 can reduce your CPC by 30–50% compared to a score of 3–4 for the same keyword. This is the most controllable lever in the auction.
  • Campaign type: Search typically costs more per click than Display. Shopping campaigns often deliver the lowest CPC for e-commerce.
  • Seasonality: HVAC costs spike in summer in Arizona. Retail costs spike in November and December. Budget for these windows in advance.

Red-flag signals that costs are rising for structural reasons:

  • CPC increases of 20%+ over 30 days with no change in targeting
  • CTR dropping below 1% on Search (suggests ad relevance is declining)
  • Impression share dropping while CPC rises (competitors are increasing bids)
  • Conversion tracking gaps (missing data leads to poor automated bidding decisions)

Improving landing page relevance directly reduces CPA. When the landing page matches the ad’s keyword and intent, Google’s Quality Score rises, which lowers your actual CPC in the auction. A page that loads in under 3 seconds and answers the search query directly tends to outperform a generic homepage redirect on both Quality Score and conversion rate.

Pro Tip: *Before raising bids to compete, check your Search Impression Share.


Costs beyond clicks: tools, creative, tracking, and management fees

Ad spend is only one line item. The total cost of running a Google Ads campaign includes tools, creative assets, tracking infrastructure, and often a management fee. Ignoring these can make a campaign look profitable when it isn’t.

Cost Category Typical U.S. Monthly Range Notes
Keyword research tools $50–$300/month Ahrefs, Semrush, or Moz for competitive analysis
Landing page builder $30–$100/month Unbounce, Instapage, or custom dev work
Call tracking $50–$100/month CallRail or similar; critical for service businesses
Creative production $200–$2,000+ (one-time or recurring) Ad copy, display banners, video for YouTube
Google Analytics / GA4 Free Setup and configuration time is the real cost
PPC management (agency) $500–$5,000+/month Varies by scope; see PPC management pricing
PPC management (freelancer) $300–$1,500/month Lower cost, less bandwidth

Diagram of monthly Google Ads cost categories

For a small business spending $1,500/month on ad spend, adding $500 in management fees and $100 in call tracking brings the real monthly cost to $2,100. That’s the number to use when calculating ROI, not just the ad spend figure.

Prioritize in this order: tracking first, creative second, then bid and budget changes. A campaign with broken conversion tracking is flying blind. Every optimization decision made without accurate data is a guess.

Pro Tip: Set up call tracking for ads before your first campaign goes live. Phone calls are the primary conversion event for most local service businesses, and without call tracking, you’re attributing zero value to your best leads.


How to lower your CPC and CPA: a prioritized checklist

The highest-impact improvements for most small businesses follow a consistent order. Start at the top and work down.

  1. Fix conversion tracking. No other optimization matters if you can’t measure what’s working. Verify GA4 goals, Google Ads conversion actions, and call tracking are all firing correctly.

  2. Improve Quality Score on your top keywords. Review expected CTR, ad relevance, and landing page experience scores in the Google Ads interface. A score below 6 on a high-spend keyword is a direct cost problem.

  3. Add negative keywords. Run a Search Terms report weekly for the first 60 days. Add irrelevant queries as negatives. This is the fastest way to stop wasting budget on clicks that will never convert.

  4. Tighten geographic targeting. If you serve Scottsdale but your ads show in Flagstaff, you’re paying for clicks from people outside your service area. Use location bid adjustments or restrict targeting to specific zip codes.

  5. Test ad copy. Run at least two responsive search ads per ad group. Google will rotate them and show the better performer more often. A 10% improvement in CTR directly improves Quality Score and lowers CPC.

  6. Optimize landing pages. Match the headline of your landing page to the keyword and ad copy. Reduce page load time. Add a clear, single call to action. These changes affect both conversion rate and Quality Score.

  7. Use ad scheduling. If your business converts best on weekday mornings, reduce bids or pause ads on evenings and weekends. This concentrates spend where it performs.

  8. Segment by device. If mobile converts at half the rate of desktop for your business, apply a negative bid adjustment on mobile to reduce wasted spend.

For illustration: adding 50 negative keywords and rewriting landing page headlines to match ad copy are two changes that, combined, tend to produce the most consistent CPA reductions for new campaigns. Results vary by account, but these two levers are the most repeatable improvements across verticals.

Pro Tip: Landing page wins compound. Pair professional web design with tightly matched ad copy and you’re addressing both sides of the Quality Score equation at once.


How to estimate your CPA and ROI before you spend

Two formulas do most of the work:

  • CPA = (CPC × clicks per conversion) or equivalently, CPA = CPC ÷ Conversion Rate
  • ROI = (Revenue per conversion − CPA) ÷ CPA

Worked example:

  • CPC: $5.00
  • Conversion rate: 4%
  • CPA: $5.00 ÷ 0.04 = $125
  • Revenue per conversion (average job value): $600
  • ROI: ($600 − $125) ÷ $125 = 3.8x, or 380%

That’s a strong return.

Folding in LTV: For businesses with repeat customers, the first-sale revenue understates the true value of a conversion. A customer who spends $600 on the first job and returns twice more is worth $1,800 in lifetime revenue. This is why B2B and subscription businesses can justify higher CPAs than the first-transaction math suggests.

  • Use conservative conversion rate estimates during early testing (cut your expected rate by 30–40% for planning).
  • Calculate break-even CPA before launch: if your margin per job is $300, your CPA must stay below $300 to avoid losing money.
  • Revisit CPA targets every 30 days as real data replaces estimates.

How long before Google Ads produces real results

New campaigns need time. The Google Ads algorithm requires conversion data to optimize automated bidding, and most accounts don’t generate enough signal in the first two weeks to draw reliable conclusions.

Timeline by phase:

  • Days 1–7: Launch, low impression share, limited data. Do not make major changes. Let the algorithm gather initial signal.
  • Days 7–30: First conversions appear. Monitor search terms, CTR, and Quality Scores. Add negatives. Fix any tracking issues.
  • Days 30–90: Statistical signal builds. Identify top-performing keywords and ad groups. Pause underperformers. Begin testing landing page variants.
  • Days 90+: Scale confidently. Increase budgets in 10–20% increments. Introduce new ad groups or campaign types based on what’s working.

Larger jumps reset the learning phase and can cause CPA to spike temporarily. Monitor CPA for 7–10 days after each increase before making another.

Seasonal effects in Arizona: Summer heat drives HVAC and pool service searches sharply higher from May through September. If you’re in a seasonal vertical, plan your 30–90 day test to start at least 6–8 weeks before your peak season. Launching a new campaign during peak season means paying peak CPCs while the algorithm is still learning. Launching in the shoulder season gives you cheaper data collection before costs rise.

Technician servicing HVAC unit outdoors


Essential tools to plan, forecast, and track your Google Ads spend

Three Google-native tools handle most of the planning work before you spend a dollar:

  • Google Ads Keyword Planner: Enter your target keywords and get CPC estimates, monthly search volume, and competition levels. Use it to validate your budget assumptions before launching. The estimates skew conservative, but they’re directionally accurate.
  • Google Ads Performance Planner: Available inside your Google Ads account, Performance Planner forecasts how changes to budget, bids, or targeting will affect clicks, conversions, and spend. Run a forecast before any major budget change.
  • GA4 (Google Analytics 4): Free and essential. Connect GA4 to your Google Ads account to track post-click behavior, conversion paths, and audience data. Without it, you’re measuring clicks but not outcomes.
  • Google Ads account reports: The Search Terms report, Auction Insights report, and Campaign Budget report are built-in and free. Use campaign budget pacing reports to see whether your budget is being spent when customer intent is highest.
  • Call tracking (CallRail or similar): For service businesses, phone calls are often the primary conversion. A call tracking tool assigns unique numbers to your ads and reports which keywords drive calls.

Add paid third-party tools (Semrush, Ahrefs, SpyFu) when you’re ready to analyze competitor keywords or expand into new verticals. For most small businesses in the first 90 days, the free Google tools are sufficient.


The Webtechs starter plan for small businesses

The most common mistake small businesses make with Google Ads is launching before the infrastructure is ready. Webtechs recommends a staged approach that prioritizes measurement and a focused test before scaling.

Step-by-step starter plan:

  1. Week 0: Tracking and goals setup
    Install GA4, configure Google Ads conversion tracking, and set up call tracking. Define your target CPA and break-even point. Do not launch until every conversion action is verified firing.

  2. Weeks 1–4: Launch a focused test campaign
    Start with one campaign, one ad group per theme, and 10–20 tightly matched keywords. Set a daily budget of $33–$50 ($1,000–$1,500/month). Use Manual CPC or Maximize Clicks. Monitor daily for the first two weeks.

  3. Weeks 4–12: Optimize and build signal
    Add negatives weekly. Pause keywords with zero conversions after 50+ clicks. Test a second landing page variant. Review Quality Scores and improve any below 6. Begin comparing CPA to your target.

  4. Weeks 12+: Scale what works
    Expand to new ad groups or campaign types (Display, Local Services Ads). Consider adding Google Local Services Ads for local service businesses, which operate on a pay-per-lead model and can complement Search campaigns.

When to move from DIY to agency management: If your monthly ad spend exceeds $2,000 and you’re spending more than 5 hours per week managing the account, the opportunity cost of DIY management usually exceeds a management fee. Webtechs handles audit, campaign setup, creative, and ongoing management for small and mid-sized businesses across Arizona.


What Webtechs sees working for U.S. small businesses

The pattern that shows up most consistently across small-business accounts is this: the businesses that get the best results from Google Ads are not the ones with the biggest budgets. They’re the ones with the tightest targeting and the most relevant landing pages.

Smartphone displaying local landing page design

A local service business in Scottsdale targeting 5 specific zip codes with a dedicated landing page for each service will almost always outperform a competitor with twice the budget running broad match keywords to a homepage. The math is simple: better relevance means higher Quality Score, lower CPC, and higher conversion rate. All three move in the right direction at once.

The most common mistakes: launching without conversion tracking (so there’s no way to know what’s working), setting budgets too low to generate signal (under $500/month in competitive verticals), and treating Google Ads as a set-it-and-forget-it channel. Campaigns that aren’t actively managed for the first 90 days tend to drift toward broad, expensive traffic.

DIY management works well when you have one focused campaign, a clear conversion goal, and time to review the account weekly. When you’re running multiple campaigns, testing new verticals, or spending over $2,000/month, the complexity of bid management, Quality Score optimization, and landing page testing usually justifies bringing in a specialist.


Webtechs handles the setup, optimization, and management for you

Running Google Ads profitably takes more than setting a budget and writing an ad. It requires tracking infrastructure, keyword strategy, landing page alignment, and consistent weekly management. That’s where Webtechs comes in.

Webtechs

Webtechs offers PPC audits, campaign setup, and ongoing management tailored specifically for small and mid-sized businesses in Arizona and across the U.S. The process starts with a budget and forecast review, a 90-day campaign plan, and conversion tracking setup. From there, Webtechs manages keyword selection, ad copy, bid strategy, and landing page recommendations, so you’re not guessing at which lever to pull.

If your current campaigns aren’t hitting target CPA, or you’re starting from scratch and want a structured 90-day test plan, see what Webtechs clients have experienced and reach out for an audit. The next step is a straightforward conversation about your budget, your goals, and what a realistic 90-day plan looks like for your business.


Sources

This article is general information, not a substitute for advice from a qualified financial advisor. Consult a qualified financial professional about your own circumstances before acting on anything here.

Hands sketching website layout on drawing pad
Written by webtechs

How to Choose a Web Designer in Scottsdale

Hands sketching website layout on drawing pad

For a Scottsdale small business, the right move is hiring a local agency that bundles custom web design, local SEO, and ongoing support under one roof. A freelancer might cost less upfront, but the businesses that see real growth from their websites typically work with a partner who understands both design and how Google ranks local results.

Top local options to evaluate:

  • Webtechs — Scottsdale-based since 1997, full-service design + SEO + hosting, recommended local partner
  • Mediafy — local agency with bundled SEO and Google Business Profile services
  • Interactive ID — Scottsdale creative agency with portfolio-driven positioning

Immediate next step: Use the discovery-call checklist in the section below to screen any of these in a 30-minute call before committing.


Key Takeaways

Choosing a web designer in Scottsdale comes down to one test: can the agency show you a site it built that measurably improved a client’s leads, traffic, or revenue?

Point Details
Hire for outcomes, not aesthetics Choose a designer who ties every decision to a business goal — calls, bookings, or form fills.
Verify ratings on Google Maps Check the five most recent reviews, not just the average star rating, before your first call.
Evaluate total cost, not headline price Confirm whether SEO, content, hosting, and post-launch support are included before comparing quotes.
Confirm ownership in writing Get CMS admin access, domain ownership, and source files in the contract before signing.
Webtechs is the recommended local partner Scottsdale-based since 1997, offering design, SEO, hosting, and content with full client ownership.

Table of Contents

Which Scottsdale web designers should you consider?

The table below covers the local options most relevant to small businesses in the Scottsdale area. Ratings and reviews shift over time, so verify each on Google Maps before you call.

Local Scottsdale business sign on storefront

How to verify ratings fast: Search the agency name on Google Maps. The star rating and review count appear immediately. Read the most recent five reviews, not just the average. A 4.8 rating with 12 reviews tells a different story than a 4.6 with 200.

Transparent pricing is a trust signal on its own. When a provider publishes starting prices, you can benchmark them against the Scottsdale web design cost guide before the first call.


How do you pick the right web designer for your business?

Diagram illustrating web designer selection steps

Start with your goals, not the portfolio. Your website is the digital front door to your business — a designer should align UX decisions with what you actually need: more calls, more bookings, more form fills. Aesthetics matter, but they are a means to that end.

Prioritized decision criteria

  1. Goal alignment — Can they map every design decision to a business outcome (leads, calls, revenue)?
  2. Portfolio relevance — Do they have work in your industry or a comparable local market?
  3. Mobile-first and performance — Is responsive design standard, and do they reference Core Web Vitals?
  4. Local SEO experience — Do they set up and optimize Google Business Profile as part of the build?
  5. Post-launch support — What happens after launch? Who owns the files?

Discovery-call questions to ask

Strategy and goals

  • What business metric will this site improve, and how will we measure it?
  • Can you show a case study where design directly improved leads or traffic?

Process and tech

  • Which CMS do you build on, and why?
  • Do you provide a staging site before launch?
  • Who handles content — you or us?

SEO and local visibility

  • Is on-page SEO included, or is it a separate line item?
  • Do you set up Google Business Profile and local schema markup?

Ownership and legal

  • Who owns the source files and CMS admin credentials at launch?
  • What does your contract say about intellectual property?

Post-launch

  • How long is the bug-fix window after launch?
  • What does ongoing maintenance cost, and what does it cover?

Pro Tip: Ask for a case study that shows traffic or lead volume before and after launch. Any agency worth hiring can produce one. If they can’t, that tells you something.

Pricing shapes to understand

Evaluate pricing by what’s included — strategy, SEO, content, and post-launch support — not just the headline number. A $1,500 site that excludes SEO setup, hosting, and content can cost more in the long run than a $4,000 package that bundles all three.

  • One-time project fee — covers design and build; hosting and SEO are separate ongoing costs
  • Monthly plan — lower upfront, spreads cost, often includes hosting and basic updates
  • Retainer — ongoing SEO, content, and maintenance bundled; best for businesses that want continued growth

Red flags to watch for

  • Guarantees a specific Google ranking within a fixed timeframe
  • Cannot show you who owns the domain and source files after launch
  • No written contract or scope of work
  • Portfolio is all mockups with no live URLs
  • Price is dramatically below every other quote with no explanation

What does a quality web design package actually include?

A reputable agency delivers more than a good-looking page. Here is what to expect and verify before signing.

Core deliverables:

  • Design mockups for approval before build
  • Responsive HTML/CSS that works on mobile, tablet, and desktop
  • CMS setup with admin training (WordPress, Webflow, or similar)
  • On-page SEO basics: title tags, meta descriptions, image alt text, schema markup
  • Google Analytics 4 and Google Search Console setup
  • Basic accessibility review (contrast, alt text, keyboard navigation)

Technical checklist to confirm on the call:

  • Mobile-first responsive design (not just “mobile-friendly”)
  • Core Web Vitals awareness and performance targets
  • Staging site for review before going live
  • Automated backups and restore capability
  • SSL certificate included

Post-launch expectations:

  • Bug-fix window of at least 30 days after launch
  • Admin training and documentation
  • Hosting and maintenance options with clear SLA for uptime
  • Clear process for requesting updates or content changes

Ownership: Confirm in writing that you receive full CMS admin access, domain ownership, and all source files at project close. Some agencies retain file ownership as leverage for ongoing contracts. That is a deal-breaker.


How we selected the Scottsdale options in this guide

The shortlist above was built using the following criteria:

  • Local presence — Scottsdale or Phoenix metro area, serving small businesses
  • Small-business focus — portfolio and positioning aimed at businesses under 50 employees
  • Transparent portfolio — live URLs or documented case studies, not just mockup screenshots
  • Measurable results — evidence of traffic, lead, or ranking improvements post-launch
  • Local SEO and GBP experience — confirmed service offering for Google Business Profile optimization

Data sources included Google Business Profile listings, provider websites and portfolio pages, published pricing pages where available, and client testimonials. Webtechs is the publisher of this guide and is recommended as a local partner. That relationship is disclosed here. If you want details on a provider not listed, contact any agency directly and ask for the same criteria above.


What agencies wish you asked before the project started

The projects that finish on time and on budget share one thing: the client came prepared. Here is what makes the difference from the agency side.

  • Bring clear goals, not just a vague brief. “I want more customers” is a starting point. “I want 20 more calls per month from people searching for HVAC repair in Scottsdale” is a brief an agency can build toward.
  • Have your assets ready. Logo files, brand colors, product photos, and copy drafts. Waiting on client assets is the single most common reason timelines slip.
  • Designate one decision-maker. Feedback from five stakeholders with conflicting opinions adds weeks and cost.
  • Be realistic about budget. A $500 website exists, but it will not rank, convert, or scale. Match your budget to your revenue goal.

Scope creep is the other timeline killer. Every “small addition” mid-project adds time and cost. Agree on a written scope before work begins, and use a formal change-order process for anything added after kickoff.


Webtechs: Scottsdale’s full-service web design partner

Webtechs

Webtechs has worked with Scottsdale small businesses since 1997, building websites that are designed to rank and convert, not just look good. The agency offers custom web design, local SEO, Google Maps marketing, hosting, content writing, and video production as a bundled or modular service.

The process runs discovery → design → build → QA → launch → ongoing support, with clients retaining full ownership of their domain, CMS, and source files at every stage. Client results include documented improvements in search visibility and lead volume across service industries in the Scottsdale area.

Ready to see what your site could do? View the Webtechs portfolio or book a discovery call to get a scoped proposal for your business.


Sources

To verify any agency’s Google rating: Search the business name on Google Maps, click the listing, and read the reviews tab. Filter by “Newest” to see recent client experience rather than a historical average.

Hands arranging index cards on mint-green desk
Written by webtechs

How to Write an Explainer Video Script That Converts

Hands arranging index cards on mint-green desk

An explainer video script is a short, spoken-first document that makes one specific audience understand one thing and take one action, typically in 60–90 seconds. Every word is written to be heard, not read. Before you open a blank doc, lock three things: your single goal, your one audience, and your one CTA. Everything else follows from those three constraints.

Here is the instant checklist:

  • One goal + one audience: Write a single sentence, e.g., “This video helps Phoenix-area HVAC owners understand why they lose leads without a follow-up sequence, and it asks them to book a free audit.”
  • One message: Every line in the script must serve that sentence. If a line does not, cut it.
  • One CTA: End on a single, explicit action. Not two options. One.

Pro Tip: Write your goal/audience sentence at the top of the doc before you draft a single word of script. It acts as a filter for every line you write.


Key Takeaways

A strong explainer video script succeeds by committing to one goal, one audience, and one CTA, then sizing every word to the target runtime before production begins.

Point Details
One goal, one audience, one CTA Write your goal/audience sentence before drafting a single line of script.
150 words per 60 seconds Use 130–150 wpm as your word-count target; read aloud with a stopwatch to confirm.
Two-column AV format Pair every voiceover line with a specific visual description to brief animators without rework.
Lock script before animation Changing lines after animation begins multiplies revision cost; sign off the script first.
Webtechs for full production Webtechs writes, storyboards, voices, and animates explainer videos for Arizona businesses, starting from a locked script.

Table of Contents

How do you write an explainer video script step by step?

A repeatable process beats raw creativity every time. Follow these seven steps in order and you will have a production-ready draft faster than you think. This workflow aligns with the seven-step process Pexo recommends for building scripts that hit their runtime and land their message.

  1. Define your goal and audience. Write one sentence naming who watches, what problem they have, and what they should do after watching. This is not optional throat-clearing. It is the script’s constitution.
  2. Pick a structure. Choose from the five proven structures covered in the next section: problem–solution, how-it-works, product demo, founder story, or FAQ/onboarding. The structure determines your scene count and hook strategy.
  3. Write the hook first. Open on the viewer’s pain or desire, not on your product. “Still losing customers before they even call you?” lands harder than “Welcome to Acme Solutions.” You have about three seconds before a viewer decides to keep watching.
  4. Draft the body sized to runtime. At roughly 150 words per 60 seconds, a 60-second script runs about 150 words total. Write lean. Every sentence should earn its place.
  5. Add one proof point. A single specific fact, customer result, or concrete number does more work than three vague claims. “Our clients cut response time by half” beats “We help businesses improve efficiency.”
  6. Write one CTA. State it plainly and once. “Visit webtechs.net to get your free quote” is better than “Visit our site, follow us on social, or call us today.”
  7. Read aloud and trim. Time yourself with a stopwatch. If you run over, cut from the body, not the hook or CTA. Tighten clauses, drop filler adjectives, and shorten sentences until the script sits comfortably inside the target runtime.

Pro Tip: Lock the script before any animation starts. Changing a single line after frames are built can multiply production cost. A script review sign-off is not bureaucracy; it is cost control.


Which script structure fits your explainer video goal?

Structure is not a creative choice. It is a strategic one. The five structures below cover nearly every explainer scenario. Each maps to a specific goal, a hook strategy, and a typical scene count. Pexo’s copy-ready example scripts demonstrate how each structure plays out at standard runtimes.

The five structures at a glance

  • Problem–solution: Opens on a pain point the audience recognizes instantly, names the cause, then presents your product as the fix. Best for awareness-stage campaigns and homepage hero videos.
  • How-it-works: Walks through a process in three or four steps. Works well for SaaS products, apps, or any service where the mechanism is the selling point. Hook strategy: open with the outcome (“Imagine your invoices reconciling themselves”), then explain how.
  • Product demo: Shows the product in action, screen by screen or feature by feature. Best for mid-funnel viewers who already know they have a problem and are evaluating options. Hook: lead with the most impressive result the product delivers.
  • Founder story: A short personal narrative explaining why the company exists. Works for early-stage brands building trust, or for campaigns targeting buyers who care about mission. Hook: open with the moment the founder felt the problem firsthand.
  • FAQ/onboarding: Answers the two or three questions new users always ask. Best for post-signup onboarding, customer success, or reducing support tickets. Hook: “Just signed up? Here is what to do first.”
Structure Best for Typical runtime Scene count What to show visually
Problem–solution Awareness, homepage hero 60–90s 4–6 Problem scene → cause → product intro → result
How-it-works SaaS, process-driven services 60–90s 3–5 Step-by-step UI or illustrated flow
Product demo Mid-funnel evaluation 60–120s 4–7 Screen recordings or animated UI walkthrough
Founder story Brand trust, early-stage 60–90s 3–5 Founder moment → problem → mission → CTA
FAQ/onboarding Post-signup, support reduction 30–60s 3–4 App screens, icons, short text callouts

The five structures at a glance — overview diagram

Five copy-ready sample scripts you can adapt right now

These scripts are calibrated to common runtimes. Swap the bracketed placeholders for your audience, product name, and CTA. Each sample includes a word count and a quick authoring note.

Pro Tip: Read each sample aloud before you adapt it. The rhythm is intentional. If a line feels awkward spoken, rewrite it before you swap the details.

Sample 1: Problem–solution (60 seconds, ~150 words)

[HOOK] Running a small business in Arizona means wearing every hat. But one hat costs you more than the rest: chasing down leads who never call back.

[PROBLEM] Many small businesses lose a significant portion of inbound leads due to lack of timely follow-up. By then, the customer has already called someone else.

[SOLUTION] [Product Name] automates your follow-up the moment a lead comes in. A personalized text goes out in under 60 seconds, every time, without you lifting a finger.

[PROOF] Businesses using [Product Name] report an increase in appointments in their first month.

[CTA] Start your free trial at [website].

Word count: ~95 words. Swap the industry pain point, the proof stat, and the CTA URL. The structure holds for any service business.

Sample 2: How-it-works (60 seconds, ~150 words)

[HOOK] What if getting your finances organized took three steps instead of three weeks?

[STEP 1] Connect your accounts. [Product Name] links to your bank, your invoicing tool, and your payroll quickly.

[STEP 2] Set your rules. Tell the system how to categorize expenses, and it learns your preferences automatically.

[STEP 3] Review and export. Every Friday, a clean summary lands in your inbox, ready for your accountant.

[CTA] Try [Product Name] free at [website].

Word count: ~90 words. This structure works for any product with a clear, sequential process. Adjust step labels to match your actual workflow.

Sample 3: Product demo (90 seconds, ~225 words)

[HOOK] Scheduling a team across multiple locations used to take [Founder Name] a long time every Monday morning. Now it is much quicker.

[DEMO BEAT 1] Open [Product Name] and click “Build Schedule.” The system pulls in your team’s availability, your location hours, and last week’s demand data automatically.

[DEMO BEAT 2] Drag and drop to adjust. Need to swap a shift? One click sends the change to both employees and updates the master calendar instantly.

[DEMO BEAT 3] Publish with one button. Every team member gets a notification on their phone. No group texts. No spreadsheets. No confusion.

[PROOF] Teams using [Product Name] report significantly reduced scheduling time.

[CTA] See it live. Book a free demo at [website].

Word count: ~130 words. For a 90-second script, you have room for three demo beats. Keep each beat to one screen or one action.

Sample 4: Founder story (60 seconds, ~150 words)

[HOOK] In 2019, [Founder Name] spent a large amount on a website that brought in no new clients.

[STORY] The site looked great, but it was invisible on Google and no one found it. That experience led [Founder Name] to build [Company Name]: an agency that makes sure small businesses actually get found online.

[WHAT WE DO] We handle your SEO, your content, and your local listings, so you show up when customers in your area are searching.

[CTA] Find out what your site is missing. Get a free audit at [website].

Word count: ~90 words. The founding moment must be specific and relatable. A vague “we saw a gap in the market” kills the trust this structure is built to create.

Sample 5: FAQ/onboarding (30 seconds, ~75 words)

[HOOK] Just signed up for [Product Name]? Here are the three things to do first.

[FAQ 1] Connect your calendar. It takes 30 seconds and unlocks the scheduling features.

[FAQ 2] Invite your team. Add up to five members on the free plan.

[FAQ 3] Set your first reminder. Pick a task, set a date, done.

[CTA] Questions? Hit the chat icon in the bottom right corner.

Word count: ~70 words. Keep onboarding scripts under 45 seconds. Viewers already signed up; they need direction, not persuasion.


How to use a two-column AV script template for production

The two-column audio/visual (AV) format is the industry standard for briefing animation teams. The left column holds your voiceover, line by line. The right column describes exactly what appears on screen during each line. StudioBinder’s explainer script template follows this five-step script-first workflow: define the idea, write the voiceover, plan visuals, time the script, then share for review.

According to Boords, a two-column AV format is critical for reducing costly animation rework because it lets animators and stakeholders approve visuals before a single frame is built.

AV template snippet

Scene Voiceover (Audio) Visuals (Video)
1 “Running a small business in Arizona means wearing every hat.” Animated character juggling icons: phone, invoice, calendar
2 “But one hat costs you more than the rest: chasing leads who never call back.” Character drops icons; one labeled “Lost Lead” floats away
3 “[Product Name] sends a follow-up text the moment a lead comes in.” Phone screen animation showing text sending in real time
4 “Businesses report booking 30% more appointments in month one.” Animated bar chart rising; stat appears as text callout
5 “Start your free trial at [website].” Logo lockup + URL on screen; CTA button animates in

How to fill the template

  • Write the voiceover column first, one line per scene beat.
  • Keep each VO line to one idea. If a line contains two ideas, split it into two rows.
  • Describe visuals specifically: “animated bar chart” beats “graphic showing growth.” Animators cannot read your mind.
  • Lock the VO column before sharing. Mark it “APPROVED” so animators know which column is final.
  • Share the doc as a comment-enabled file (Google Docs or Notion work well). Stakeholders comment on the visuals column only, not the VO.

Pro Tip: Add a “Status” column to the right of Visuals with values like Draft / Approved / In Production. This single column eliminates most of the “wait, which version are we animating?” confusion.


How many words do you need for a 15, 30, 60, 90, or 120-second script?

At a natural spoken pace of roughly 130–150 words per minute, the math is straightforward. Pexo’s pacing guidance pegs 150 words to 60 seconds as a practical rule of thumb. Slower, warmer delivery styles sit closer to 130 wpm; faster, energetic reads push toward 150 wpm.

How to test your pacing before you record

  1. Print or display the script in plain text, no formatting distractions.
  2. Read aloud at the pace you expect the voiceover artist to use. Use a stopwatch, not a mental count.
  3. If you run over by more than five seconds, cut from the body, not the hook or CTA.
  4. Factor in music beats and visual transitions. A two-second pause for a logo reveal eats into your word budget.
  5. Run a text-to-speech (TTS) pass using a tool like Google’s TTS or a scratch read in Runway ML to hear the rhythm before committing to a paid voiceover session.

One rule worth keeping: if your script is trying to make two separate points, it is actually two scripts. Split it, or cut one point entirely. A 60-second video that makes one argument clearly outperforms a 90-second video that makes two arguments vaguely.


Editing checklist: how do you trim a script to one message?

Here is how to fix that.

The editing checklist

  • Cut jargon. If a viewer would need to Google a term, replace it with plain language.
  • Shorten clauses. “In order to help you understand how our platform works” becomes “Here is how it works.”
  • Remove the second message. Find the line where the script pivots to a new idea. Cut everything after it or build a separate video.
  • Keep one proof point. Two statistics compete for attention. One sticks.
  • One CTA only. If you wrote “visit our site or call us today,” delete one.
  • Read it aloud one final time. Any line that trips your tongue will trip the voiceover artist.

Before and after: one line, tightened

Before: “Our platform is designed to help small business owners who are struggling with managing their customer relationships more effectively and efficiently, which can lead to better outcomes for their business overall.”

After: “Our platform helps small business owners manage customer relationships without the chaos.”

The before version runs 35 words and says nothing specific. The after version runs 14 words and implies a concrete pain point. That is the edit.

Common mistakes that kill explainer video performance

  • Opening on the product. “Welcome to [Company Name]” is the single most common opening line and the least effective. Open on the viewer’s problem instead.
  • Multiple CTAs. Every additional CTA you add reduces the chance the viewer takes any action at all.
  • Overstuffing scenes. Three ideas in one scene means the animator has to choose which to show. They will guess wrong. One idea per scene.
  • Writing for the eye, not the ear. Dense noun phrases and long subordinate clauses read fine on a page and sound terrible spoken aloud.

Pro Tip: Before you send the script to production, run a quick TTS pass using a free tool. If the synthesized voice sounds robotic or rushed, your sentences are too long or your punctuation is off. Fix the script, not the voice.


How many scenes do you need, and what assets should you prepare?

Scene count is one of the most overlooked decisions in script planning. Too many scenes and the animation feels rushed. Too few and the video drags. A 30–60 second script typically needs 3–5 scenes. A 90-second script can support 4–7 scenes comfortably.

Fewer scenes is almost always better. Each scene transition costs time and risks losing the viewer’s thread. A single well-illustrated scene with a clear visual metaphor does more work than three quick cuts.

Asset checklist for your animation brief

  • Icons: One icon per concept. Use a consistent style (flat, outline, or filled) across all scenes.
  • Character frames: If you use an animated character, define three to five poses or expressions upfront. Animators build from a character sheet.
  • Product screenshots or UI captures: Export at 2x resolution. Annotate which screen state matches which VO line.
  • Music cue: Specify tempo and mood (e.g., “upbeat, 120 bpm, no lyrics”). Music affects pacing more than most clients expect.
  • SFX: Note any specific sound effects (notification ping, button click) in the visuals column of your AV script.
  • On-screen text: Use it to reinforce the spoken word, not repeat it verbatim. If the VO says “30% more appointments,” the on-screen text can show “30%” as a large callout, not the full sentence.

Scene count and example descriptions for a 60-second script


What tools and workflow turn a script into a finished video?

Once the script is locked, you have three realistic paths to a finished video: AI-assisted production, a mid-market template studio, or a full-service agency. Each has a different cost profile, speed, and level of control.

Storyboard sketch pad and drawing tools on desk

MyPromoVideos reports that a 60-second explainer can run anywhere from $500 to $25,000+, depending on animation style, script complexity, and revision rounds. Viralix puts the mid-market benchmark for a polished 60-second animated explainer at roughly $5,000–$8,000, and notes that script quality tends to drive performance more than raw production spend.

That last point matters. A great script in a $500 template video will outperform a weak script in a $10,000 custom animation. Spend the time on the script first.

Tool options and trade-offs

  • AI script-to-video tools (e.g., Runway ML): Fast, low cost, good for internal content or social clips. Limited visual customization. Best when speed matters more than brand precision. For a broader look at AI tools for coaching and training videos, TechVideoBlog covers the current field well.
  • Online template studios: Mid-range cost, pre-built animation styles, faster turnaround than custom. Best for standard explainer formats where a template style fits the brand.
  • Mid-market studios: Custom animation, professional voiceover, storyboard review. Typical range: $3,000–$10,000 for 60 seconds. Best for homepage hero videos or investor decks where brand quality is non-negotiable.
  • Full-service agencies: End-to-end production including strategy, scripting, animation, and distribution. Higher cost, longer timeline, but the script and the video are built together from day one.

If you want to explore AI script generators before you commit to a production path, that resource surveys the current tools and their actual outputs.

  1. Lock the script (signed off by all stakeholders).
  2. Build a storyboard or rough shot list from the AV template.
  3. Run a scratch voiceover for timing (TTS or a quick internal read).
  4. Create style frames for one or two key scenes before full animation begins.
  5. Animate approved scenes only.
  6. Final QA: check audio sync, on-screen text accuracy, and CTA legibility.

Pro Tip: A script-first pipeline, where the script is fully approved before any animation begins, is the most reliable way to control cost and timeline. Changing a line after animation starts multiplies revision cost fast.


How Webtechs produces explainer scripts: process and briefing template

Webtechs follows a script-first production process for every video production project. The script is written, reviewed, and signed off before any visual work begins. That discipline keeps revisions predictable and costs controlled.

The Webtechs script-to-video process

  • Brief: Client fills out a one-page brief covering audience, goal, tone, CTA, and target length.
  • Script draft: Webtechs writes a spoken-first script in the two-column AV format, calibrated to the agreed runtime.
  • Script review: Client approves the VO column. Visual descriptions are refined in parallel.
  • Storyboard and style frames: Key scenes are illustrated before full animation begins.
  • Voiceover: Professional VO is cast and recorded against the locked script.
  • Animation and delivery: Final video delivered in web-ready formats, sized for homepage, social, and email use.

Before and after: script trimmed and remapped

Before (first draft, unfocused):
“At Webtechs, we have been helping businesses in Arizona and across the country with their digital marketing needs since 1997, and we offer a full range of services including web design, SEO, content writing, video production, and much more, all designed to help you grow your business online.”

After (production-ready):
“Since 1997, Webtechs has helped Arizona businesses show up on Google and convert visitors into customers. Web design, SEO, and video, built together.”

The before version runs 54 words and lists features. The after version runs 27 words, names a specific outcome, and sets up the CTA naturally.

Briefing template: use this to request a quote or brief any studio

Field Your answer
Target audience Who watches this video? (e.g., “Arizona HVAC owners”)
Single goal What should they do after watching? (one action only)
Tone Conversational / professional / energetic / calm
CTA Exact URL or phone number to feature
Target length 30s / 60s / 90s / 120s

Pro Tip: Fill out this briefing template before you contact any studio, including Webtechs. A completed brief cuts the back-and-forth in half and gets you to a first draft faster. Studios price more accurately when the brief is specific.


When should you DIY your explainer video versus hire a studio?

Three criteria settle this decision for most small and mid-sized businesses.

Audience scale. If the video will be seen by a few hundred people in a low-stakes context (internal training, a niche product page), a DIY or AI-assisted approach is entirely reasonable. If it is the first thing a prospect sees on your homepage, the production quality signals your brand quality. That is not the place to cut corners.

Complexity. A simple problem–solution or FAQ script with flat icon animation is well within reach of template tools. A multi-scene product demo with custom characters, UI walkthroughs, and branded motion graphics is not. Trying to force complex animation through a template tool costs more time than it saves money.

Budget and time. AI-assisted tools can produce a usable 60-second clip in a day or two for under $500. A mid-market studio delivers a polished result in two to four weeks for $3,000–$10,000. A full-service agency runs $10,000–$25,000+ and takes four to eight weeks. The question is not which is cheapest. It is which fits the stakes of the placement.

For most small and mid-sized businesses, the right call is: write the script yourself using the process in this guide, then hire production for anything that will live on a homepage, in a paid ad, or in a sales deck. The script is the highest-leverage investment. Spend the time there first, and the production spend will go further regardless of which path you choose.


Webtechs handles script writing, production, and delivery for Arizona businesses

Writing a strong explainer script is half the job. Turning it into a finished, on-brand video that actually lives on your site and drives conversions is the other half. Webtechs has handled both sides for Arizona small businesses since 1997.

Webtechs

The Webtechs production service covers script writing, storyboarding, professional voiceover casting, animation, and final delivery in web-ready formats. Every project starts with a locked script, which keeps revision rounds predictable and production costs from spiraling. A finished explainer video from Webtechs is built to work as a homepage hero, a paid social asset, or an email embed, not just a standalone file.

Check the Webtechs portfolio to see examples of completed projects, or visit the pricing page to understand what a project at your scale typically costs. When you are ready to move forward, the briefing template in this guide is all you need to get a quote started.


Sources

The following resources supply templates, timing guidance, example scripts, and production cost benchmarks used throughout this article.

Hand holding smartphone near dark screen showing landing page out of focus
Written by webtechs

PPC Landing Pages That Convert: A Practical Playbook

Hand holding smartphone near dark screen showing landing page out of focus

A PPC landing page is a single-purpose conversion page that mirrors the ad’s exact promise and removes every distraction standing between the visitor and one measurable action. Three things matter immediately: match your headline word-for-word to the ad, give the page one CTA, and check load speed before you spend a dollar. Get those right and your Google Ads Quality Score improves, your cost-per-click drops, and your conversion rate climbs.

  • Match the headline. Copy the ad’s core offer phrase into the page’s H1.
  • One CTA only. Every additional link or button cuts conversion probability.
  • Speed check. Target fast mobile load times. Core Web Vitals (LCP, INP, CLS) feed directly into Quality Score.

Over half of all website traffic now comes from mobile devices, so a slow or cluttered page doesn’t just frustrate visitors — it costs you money on every click you’ve already paid for.


Key Takeaways

A PPC landing page succeeds or fails on three fundamentals: message match between the ad and the page, a single conversion goal with no distractions, and a mobile load time under 2 seconds.

Point Details
Message match is non-negotiable Mirror the ad’s headline, offer terms, and CTA label on the page — any gap kills conversions.
One CTA per page Every additional link or button reduces the probability of the primary conversion.
Mobile speed target Aim for under 2 seconds; Core Web Vitals (LCP, INP, CLS) feed directly into Google Ads Quality Score.
Test one change at a time Run headline, CTA, hero image, and form-length tests in sequence; 100 conversions per variant before calling results.
Webtechs for full-service builds Webtechs handles discovery, message-match audits, design, tracking setup, and ongoing optimization for Arizona SMBs.

Table of Contents

What every high-converting PPC landing page needs

Dedicated PPC landing pages convert substantially higher than homepages because they’re built around one job. Here’s what that structure looks like in practice.

Hero headline and supporting subhead. The headline should repeat the ad’s offer language almost verbatim. If the ad says “Free Roof Inspection in Phoenix,” the H1 says “Free Roof Inspection in Phoenix.” The subhead adds one line of proof or urgency: “Licensed contractors. Same-week appointments available.”

Single, benefit-driven CTA. The button label should name the outcome, not the action. “Get My Free Quote” outperforms “Submit” every time. Keep forms to four fields or fewer — name, email, phone, and one qualifying question. Every extra field you add reduces the odds someone finishes.

Hero visual. The image above the fold should reinforce the offer, not decorate the page. A photo of the actual product, a before/after, or a short explainer video tied to the ad’s promise all work. Generic stock photography of smiling people in offices does not.

Service professional installing equipment on home exterior

Social proof above the fold. Trust badges, star ratings, review counts, or a single strong testimonial should be visible without scrolling. This is especially important for local-service and professional-service pages, where trust is the primary conversion barrier.

Minimal navigation. Remove the global nav. Remove the footer links. The only clickable elements on the page should be the CTA and, optionally, a phone number. Every exit point you leave open is a conversion you’re giving away.

Microcopy for objections. A line under the form button — “No credit card required” or “We never share your info” — removes the last hesitation before a visitor clicks.

Pro Tip: Place your CTA button both above the fold and again after your social proof section. Visitors who scroll past your testimonials are already more convinced — give them a second chance to convert without scrolling back up.


How to nail message match between your ad and landing page

Think of the ad and the landing page as a relay race. The ad creates intent and hands the baton to the page. If the page drops it — different headline, different offer, different tone — the visitor bounces and you’ve paid for nothing.

Shopify’s guide to PPC landing page design frames this well: the ad sets an expectation, and the landing page must catch that expectation immediately. Mismatches, even subtle ones, create a split-second of doubt that kills conversions.

Here’s what to audit on every page before launch:

Headline. Does the H1 contain the ad’s primary offer phrase? Not a paraphrase — the actual words.

URL path. Does the URL slug reinforce the offer? /hvac-summer-tune-up beats /services.

Offer copy. If the ad mentions a price, discount, or deadline, the page must show the same figure. A visitor who clicked “$49 inspection” and lands on a page with no price mentioned will assume the deal expired.

CTA label. The button text should echo the ad’s call to action.

Visual tone. If the ad uses a bold, high-contrast design with red urgency elements, a soft pastel landing page creates cognitive dissonance. Keep the color palette and visual energy consistent.

Before (broken): Ad says “Get a Free Website Audit — Limited Spots.” Landing page headline reads “Digital Marketing Services for Arizona Businesses.” The visitor has no idea they’re in the right place.

After (fixed): Landing page H1 reads “Claim Your Free Website Audit — Limited Spots Available.” The offer, the urgency, and the free-value hook all carry through.


Design and UX rules that increase conversions

Visual hierarchy is the order in which a visitor’s eye moves down the page. Get it wrong and the CTA gets buried. The correct order: hero (headline + subhead + CTA), proof (testimonials or trust badges), benefits (three to five bullet points), a second CTA, and supporting details (FAQs, guarantees, fine print) at the bottom.

Do/don’t checklist for the hero area:

  • Do: Use a headline that names the specific outcome the visitor gets.
  • Do: Place the primary CTA button above the fold, in a contrasting color.
  • Do: Use directional cues (an arrow, a person’s gaze) that point toward the CTA.
  • Don’t: Use a hero image that competes with the headline for attention.
  • Don’t: Put two equally prominent CTAs side by side — pick one.
  • Don’t: Use autoplay video with sound. It startles visitors and increases bounce.

Mobile vs. desktop. On mobile, stack content vertically and make tap targets at least 44px tall. Condense the hero copy — a three-line headline that reads well on desktop often needs to be cut to one punchy line on a 375px screen. Move the form below the headline rather than beside it. Test on an actual phone, not just a browser resize.

Microcopy examples that remove hesitation:

  1. Button: “Get My Free Quote” (not “Submit”)
  2. Under the form: “Takes 30 seconds. No spam, ever.”
  3. Phone number label: “Prefer to talk? Call us now.”
  4. Error state: “Please enter a valid email — we’ll send your results there.”

Small copy changes like these consistently lift form completion rates because they answer the visitor’s unspoken objection at the exact moment it arises.


Speed, mobile performance, and technical musts for PPC pages

Page speed isn’t a nice-to-have for paid traffic. Google’s landing page guidance is explicit: fast mobile load times and relevant content are the two primary levers for improving landing page experience, which feeds directly into Quality Score. A lower Quality Score means higher CPCs for the same ad position.

Target: fast mobile load times to keep visitor engagement. Longer load times risk losing a significant share of paid visitors before the page even loads.

Core Web Vitals to monitor:

  • LCP (Largest Contentful Paint): Measures how fast the main content loads. Target under 2.5 seconds. Fix: compress hero images to WebP format, preload the hero image in the HTML <head>.
  • INP (Interaction to Next Paint): Measures responsiveness to user input. Fix: remove unused JavaScript and defer non-critical scripts.
  • CLS (Cumulative Layout Shift): Measures visual stability. Fix: set explicit width and height attributes on all images and embeds so the browser reserves space before they load.

Quick wins for marketers (ask your developer for these):

  • Convert all images to WebP. A 400KB JPEG becomes roughly 100KB in WebP with no visible quality loss.
  • Inline critical CSS so the above-the-fold content renders without waiting for a full stylesheet download.
  • Remove or defer any third-party scripts (chat widgets, social embeds) that aren’t essential to conversion.
  • Use a CDN so the page loads from a server close to the visitor.

Tracking setup. Before you run a single click, confirm UTM parameters pass through to GA4, your conversion pixel fires on the thank-you page, and phone call conversions are tracked via a dynamic number insertion tool. Call tracking for ads is often the most overlooked gap in PPC measurement — if a visitor calls instead of filling out the form, that conversion disappears from your data without it.

Pro Tip: Run your landing page through Google PageSpeed Insights and Google Search Console’s Core Web Vitals report before launch. Both are free and give you specific, prioritized fixes rather than generic advice.


A/B testing and an optimization roadmap for PPC pages

The rule is simple: change one thing at a time. Testing two elements simultaneously makes it impossible to know which change drove the result. HubSpot’s guidance on PPC landing pages recommends a structured sequence, and the logic holds: start with the elements that have the highest impact on first impressions.

Recommended testing sequence:

  1. Headline — the single highest-leverage element. Test the ad’s exact phrase vs. a benefit-led variant.
  2. CTA button copy — “Get My Free Quote” vs. “Start My Free Trial” vs. “Claim Your Spot.”
  3. Hero image — product photo vs. lifestyle image vs. explainer video thumbnail.
  4. Form length — 4 fields vs. 2 fields. Shorter forms almost always increase submissions; the trade-off is lead quality.
  5. Social proof placement — above the fold vs. directly above the CTA.

On sample size. Don’t call a test after 50 conversions. A common threshold for reasonable confidence is 100 conversions per variant before drawing conclusions. Running a test for less than two weeks also risks day-of-week bias — a Monday-heavy sample may not represent your full audience.

Experiment Primary metric Secondary metric Risk level
Headline variant Conversion rate Bounce rate Low
CTA button copy Click-through rate on CTA Form starts Low
Hero image swap Conversion rate Time on page Low
Form length (4 vs. 2 fields) Form completions Lead quality (CRM) Medium
Social proof placement Conversion rate Scroll depth Low
Urgency element (countdown) Conversion rate Bounce rate Medium

Diagram of PPC A/B testing experiments with metrics and risk

Run tests in order of risk. Low-risk experiments (copy changes) cost nothing to revert. Medium-risk changes (form structure, urgency elements) can hurt lead quality if they attract the wrong visitors, so monitor CRM data alongside raw conversion counts.


How to measure success: KPIs and reporting for PPC pages

Conversion rate is the headline number, but it doesn’t tell the whole story.

Primary KPIs:

  • Conversion rate: form fills, purchases, or calls divided by total sessions. Vertical benchmarks vary significantly — financial services pages average around 8.4%, B2B SaaS runs 2.5–4%, home services sits near 3.8%, and legal around 4.2%. Know your vertical’s baseline before judging your own numbers.
  • Cost per acquisition (CPA): total ad spend divided by conversions. The threshold that triggers optimization depends on your product margin.
  • ROAS (Return on Ad Spend): revenue divided by ad spend. Relevant for ecommerce; less useful for lead-gen where deal close rates vary.
  • Cost per lead (CPL): total spend divided by qualified leads. More useful than raw CPA for service businesses.
  • Landing page bounce rate (GA4): a high bounce rate on a paid session usually signals message mismatch or a slow load, not a bad offer.
  • Quality Score (Google Ads): a 1–10 score that reflects expected CTR, ad relevance, and landing page experience. A score below 5 on a core keyword is a direct signal to audit the page.

Secondary signals worth watching:

  • Form abandonment rate (how many visitors start but don’t finish the form)
  • Scroll depth (are visitors reaching your social proof and second CTA?)
  • Session recordings and heatmaps via tools like Microsoft Clarity or Hotjar
  • Micro-conversions: video plays, calculator uses, chat initiations

Example GA4 + Google Ads dashboard setup:

Metric Source Threshold to act
Conversion rate GA4 / Google Ads Below vertical benchmark
CPA Google Ads Above target margin
Bounce rate (paid sessions) GA4 Over half
Quality Score Google Ads Below 6 on core keywords
LCP PageSpeed Insights / CWV Above 2.5 seconds
Form abandonment GA4 funnel / Hotjar Above 50%

Set up conversion tracking in GA4 with distinct events for macro conversions (form submit, purchase) and micro conversions (phone click, video play). Attribution windows matter: a 30-day click window is standard for most lead-gen campaigns, but check whether your sales cycle is longer before shortening it.


Tools, platforms, and templates to build and test PPC pages

The right tool depends on how fast you need to launch and how much technical control you want.

Hosted landing page builders are the fastest path from idea to live page. They come with pre-built templates, built-in A/B testing, and integrations with major CRMs and ad platforms.

  • Unbounce is purpose-built for PPC. Its Smart Traffic feature routes visitors to the variant most likely to convert based on their attributes. Strong integration with Google Ads and GA4, and a template library built around conversion best practices. User reviews on G2 consistently highlight ease of use and testing speed as its primary strengths.
  • Leadpages is a solid choice for small businesses and solo marketers who need to launch quickly without a developer. Templates are clean, the drag-and-drop editor is straightforward, and it connects to most major email and CRM tools.

CMS-based pages (WordPress with a page builder like Elementor or Divi) give you more design control and keep everything on your own domain. The trade-off is slower setup and more maintenance. Good for teams with a developer on call.

Custom builds make sense at scale — when you’re running dozens of ad groups and need dynamic content insertion or deep CRM integration that off-the-shelf tools can’t handle.

Must-configure integrations before launch:

  • Google Ads conversion tracking (linked to GA4 or direct pixel)
  • GA4 with enhanced measurement and custom events
  • Google Tag Manager for clean, auditable tag management
  • CRM webhook or native integration (HubSpot, Salesforce, or equivalent)
  • Call tracking (dynamic number insertion tied to UTM source)

Quick selection guide:

  • Lead gen, fast launch, limited budget: Leadpages or Unbounce
  • Ecommerce product pages: Shopify’s native landing page tools or a Shopify-compatible builder
  • Local services with call-heavy conversions: custom or CMS-based page with call tracking configured from day one
  • Keyword research and competitive benchmarking: Semrush’s advertising toolkit for identifying which landing page angles competitors are running

Real examples and annotated templates you can copy

Four templates cover the most common PPC scenarios. Each one is generic enough to adapt in under an hour.

1. Lead-gen (local service)

Headline: “Free [Service] Estimate in [City] — Book in 60 Seconds”
Subhead: “Licensed, insured, and [X] 5-star reviews on Google.”
Hero visual: Photo of the actual service being performed, or a team photo with uniforms and branded vehicle.
CTA: “Get My Free Estimate”
Form fields: Name, phone, zip code, service type (dropdown)
Trust signals: Google rating badge, BBB accreditation, years in business

For local-service pages, above-the-fold social proof is the primary trust lever. A visitor searching “emergency plumber Scottsdale” is already in buying mode — they need to know you’re legitimate before they’ll hand over a phone number. Google Business Profile optimization feeds directly into the review counts you can display here.

2. Ecommerce product page

Headline: “[Product Name]: [Primary Benefit] — Ships Free Today”
Subhead: “Over [X] customers. [Return policy in one line].”
Hero visual: Product on white background plus one lifestyle shot showing it in use.
CTA: “Add to Cart” (above fold) + “Buy Now — Free Shipping” (below reviews)
Form fields: None — streamlined add-to-cart flow
Urgency element: “Only [X] left in stock” or a countdown to same-day shipping cutoff

Shopify’s built-in landing page tools handle most of this natively. For ad-specific variants, a dedicated page (not the standard product page) lets you test headlines and offers without affecting your organic product listing.

3. Free-trial SaaS

Headline: “Start Your Free [X]-Day Trial — No Credit Card Required”
Subhead: “Join [X] teams already using [Product] to [specific outcome].”
Hero visual: Product screenshot or short screen-recording GIF showing the key feature.
CTA: “Start Free Trial”
Form fields: Email only (or email + company name)
Objection copy: “Cancel anytime. Setup takes under 5 minutes.”

The “no credit card required” line belongs in both the headline area and the button microcopy, as it removes the single biggest friction point for SaaS trials.

4. Local services with a calculator or qualifier

Headline: “See How Much You Could Save on [Service] in [City]”
Subhead: “Answer 3 quick questions. Get a personalized estimate instantly.”
Hero visual: Calculator UI mockup or a simple graphic showing the savings range.
CTA: “Calculate My Savings”
Form fields: Multi-step: 3 qualifying questions, then name and email on the final step
Dynamic content note: If you’re running ads to multiple cities in Arizona, use URL parameters to swap the city name in the headline dynamically. Unbounce’s Dynamic Text Replacement and Google Ads’ ValueTrack parameters make this straightforward.

  • Use urgency (countdown timers, limited spots) only when the scarcity is real. Fake urgency erodes trust the moment a visitor returns and sees the same timer reset.
  • Quizzes and calculators work well for higher-consideration purchases where the visitor needs to feel understood before converting.
  • Dynamic content for segmented ads: if you’re running separate ad groups for “commercial HVAC repair” and “residential HVAC repair,” each group should point to a page where the headline and hero image reflect that specific segment.

Common PPC landing-page mistakes and how to fix them

Most underperforming pages share the same handful of problems. Here’s what to look for and what to do about it.

  • Sending paid traffic to the homepage. The homepage serves too many audiences and has too many exit points. Dedicated landing pages consistently outperform homepages for paid traffic. Fix: build a dedicated page for each ad group or campaign theme.
  • Message mismatch. The ad promises one thing; the page says something else. Fix: do a side-by-side audit of the ad and the page headline before launch. The offer language must match.
  • Slow mobile load. A page that takes 4 seconds to load on a phone loses a large share of paid visitors before they see the offer. Fix: run PageSpeed Insights, compress images to WebP, and defer non-critical scripts.
  • Too many CTAs. Three buttons pointing to three different actions split the visitor’s attention and reduce the probability of any single conversion. Fix: pick one goal per page, one CTA.
  • Long forms. Asking for company size, annual revenue, and job title on a first-touch lead-gen page kills completion rates. Fix: cut to four fields or fewer. Qualify leads in the follow-up sequence, not the form.
  • Missing or broken conversion tracking. If your Google Ads conversion pixel isn’t firing, you’re optimizing blind. Fix: use Google Tag Manager’s preview mode and GA4’s DebugView to confirm every event fires before you spend.
  • No social proof. A page with no reviews, ratings, or trust badges asks visitors to take a leap of faith. Fix: add at least one trust signal above the fold — a star rating, a client count, or a recognizable logo.

Triage process for a low-performing page: Start with a heatmap (Microsoft Clarity is free) to see where visitors drop off. If most exits happen above the fold, the headline or load speed is the problem. If visitors scroll but don’t click, the CTA or social proof needs work. Run one A/B test on the highest-friction point before changing anything else.


When to DIY and when to hire an agency

The decision comes down to four variables: budget, testing velocity, in-house technical skills, and how fast you need results.

DIY makes sense when:

  • You have one or two campaigns and can manage a builder like Unbounce or Leadpages yourself.
  • Your monthly ad spend is low enough that agency fees would represent a disproportionate share of budget.
  • You have someone in-house who can write copy, interpret GA4 data, and run basic A/B tests.

Hiring an agency makes sense when:

  • You’re running multiple campaigns across different verticals or geographies and need consistent message match across dozens of pages.
  • Your current pages have poor Quality Scores and you’re not sure why.
  • You need tracking, CRM integration, and ongoing optimization but lack the technical bandwidth.

Agency evaluation checklist:

  1. Ask for landing page case studies with before/after conversion data, not just traffic numbers.
  2. Ask how they handle message match audits — do they review ad copy and page copy together?
  3. Ask about their A/B testing cadence. Monthly tests are the minimum; weekly is better.
  4. Confirm they set up conversion tracking before launch, not after.
  5. Ask which tools they use for session recordings and heatmaps.
  6. Check their reporting format — you should see CPA, conversion rate, and Quality Score in every report.

Sample timeline for an agency-led landing page project:

  1. Week 1: Discovery and message-match audit (ad copy, existing pages, competitor pages).
  2. Week 2: Wireframe and copy draft, client review.
  3. Week 3: Design and development, tracking setup (GA4, Google Ads pixel, call tracking).
  4. Week 4: QA, launch, and baseline data collection.
  5. Weeks 5–8: First A/B test cycle; optimization based on heatmap and conversion data.

Webtechs handles this full scope for small and mid-sized businesses in Arizona, from the initial message-match audit through design, development, tracking, and ongoing optimization. If you’re evaluating whether agency help is worth the cost, PPC management pricing breaks down what a typical engagement looks like for SMBs.


What most PPC landing page advice gets wrong

The standard advice — match your headline, use one CTA, make it fast — is correct. But it’s also incomplete in a way that costs marketers real money.

The part most guides skip is the funnel alignment problem. A landing page that converts well for a bottom-of-funnel “buy now” keyword will perform poorly for a mid-funnel “how does X work” keyword, even if the page is technically perfect. The offer has to match not just the ad’s words but the visitor’s stage of intent. Sending someone who searched “what is PPC” to a “Get a Free PPC Audit” page is a message match failure even if the headline says “PPC.” The intent is informational; the page is transactional.

The second thing most guides underweight is Quality Score’s compounding effect. Over a $5,000/month budget, that’s a meaningful difference. Yet most marketers treat Quality Score as a vanity metric and optimize for conversion rate alone. The two are connected — a page that converts well is usually also relevant and fast, which lifts Quality Score — but it’s worth tracking both explicitly.

Third: form length advice is almost always oversimplified. “Fewer fields = more conversions” is true for raw submission volume. It’s not always true for qualified leads. A two-field form (name + email) might double your lead count while halving the close rate if it attracts tire-kickers who never intended to buy. The right form length depends on your sales process, not a universal rule. Test it — but track lead quality in your CRM, not just form completions in GA4.

The practical takeaway: treat your landing page as a system with three connected levers — relevance (message match + intent alignment), trust (social proof + speed), and friction (form length + CTA clarity). Pull all three before declaring a page optimized.


Webtechs builds and optimizes PPC landing pages for Arizona businesses

Running paid ads without a purpose-built landing page is the most common way small businesses waste their Google Ads budget. Webtechs has been building conversion-focused pages for Arizona SMBs since 1997, handling everything from the initial message-match audit to design, development, tracking setup, and ongoing A/B testing.

Webtechs

The difference between a generic web page and a page built specifically for a paid campaign is measurable in Quality Score, CPA, and conversion rate. Webtechs’s process starts with your ad copy and works backward to the page, so the two are aligned from day one. No guesswork on what to test first, no missing conversion pixels, and no pages that look great but don’t convert.

Browse the Webtechs portfolio to see past work, or visit the professional web design page to get a quote for a landing page built around your specific campaign goals.

Sources


Hand placing location pin on local map
Written by webtechs

Best Local SEO Tools for Small Businesses in 2026

Hand placing location pin on local map

For most Scottsdale small businesses, the practical shortlist of local SEO software comes down to four starting points: Google Business Profile (free, non-negotiable), BrightLocal for all-in-one reporting and rank tracking, Whitespark when citation accuracy is the priority, and Webtechs when you’d rather have a local agency manage everything.

  • Google Business Profile: Free direct control over your Google Maps listing and local pack presence — start here before any paid tool
  • BrightLocal: Best single dashboard for rank tracking, GBP audits, review management, and white-label reports
  • Whitespark: Best when citation cleanup and manual accuracy are the main problem
  • Webtechs: Best when you want managed local SEO outcomes without running the tools yourself

Key Takeaways

Google Business Profile is the single highest-leverage starting point for local SEO — free, direct, and the foundation every paid tool builds on.

Point Details
Start with GBP Claim and fully optimize your Google Business Profile before spending on any paid tool.
BrightLocal for reporting Use BrightLocal (moderate monthly price) when you need rank tracking, GBP audits, and review management in one place.
Whitespark for citations Choose Whitespark when citation accuracy and manual cleanup are your primary problem.
Yext for enterprise scale Yext targets enterprises, not single-location small businesses.
Webtechs for managed service Webtechs handles GBP, citations, and reporting as a single retainer for Scottsdale businesses.

Table of Contents

What are the best local SEO tools for small businesses?

The seven options below cover every budget and approach, from free to enterprise to fully managed.

Pricing and trial notes:

  • Google Business Profile costs nothing and should be claimed and optimized before spending a dollar on any tool
  • BrightLocal offers plans starting at a moderate monthly price, making it an affordable all-in-one option for small businesses that need rank tracking, GBP audits, and review tools under one login, with a free trial available
  • Moz Local is among the lowest-cost paid options at roughly $14/month per location
  • Yext targets enterprises with pricing that reflects its scale; it’s not built for a single-location shop
  • GBPPromote uses flat per-location pricing that can undercut stacking multiple tools

Pro Tip: If budget allows, pair Whitespark’s citation tools with BrightLocal’s reporting dashboard. You get best-in-class citation accuracy AND polished client-ready reports without giving either up.

BrightLocal vs Whitespark: which one fits your situation?

BrightLocal is the stronger all-round pick for most SMBs; Whitespark wins when citation accuracy and manual cleanup are the actual bottleneck.

Dimension BrightLocal Whitespark
Starting price moderate monthly price Separate plans; free tier available
Citation focus Bundled builder and tracker Industry-leading Local Citation Finder and manual cleanup
Rank tracking Geo-grid (Local Search Grid) Daily rank tracking
White-label reports Yes, polished Limited
Review management Yes, with AI reply tools No
Consulting option No Yes

According to G2 user reviews, BrightLocal scores strongly for local search optimization and rank tracking, while Whitespark earns higher marks from some reviewers on ease of setup and support quality.

BrightLocal offers plans starting at a moderate monthly price, making it an affordable all-in-one option for small businesses that need rank tracking, GBP audits, and review tools under one login. making it one of the most affordable all-in-one options for small businesses that need rank tracking, GBP audits, and review tools under one login.

BrightLocal pros: single dashboard, white-label reporting, review management, geo-grid tracking
BrightLocal cons: citation accuracy is not its primary strength; costs add up with add-ons

Whitespark pros: best manual citation research in the category, daily rank tracking, expert consulting available
Whitespark cons: no review tools, no white-label reports, requires separate purchases for rank tracking and citations

Red flag: Pay-per-use citation credits can accumulate fast. Set a monthly cap before you start any citation cleanup campaign.

What most small businesses get wrong about local SEO tools

The standard advice is to pick a tool and start tracking. The problem is that most small businesses buy a tool before they’ve claimed and fully optimized their Google Business Profile, which is free and feeds every local pack result directly.

Claiming GBP, Bing Places, and Apple Business Connect costs nothing and moves the needle before any paid subscription does. A paid rank tracker showing you’re in position 14 is less useful than fixing the GBP category, hours, and photos that are keeping you there.

The other mistake: treating the BrightLocal vs Whitespark decision as either/or when the real question is what your biggest gap is. Citation mess? Whitespark. Reporting and reviews? BrightLocal. Both problems? Use both, or hire an agency that handles it as a package.

Webtechs handles local SEO so you don’t have to

There are solid tools on this list. The honest trade-off is time: learning dashboards, managing citations, responding to reviews, and reading rank reports takes hours every month that most business owners don’t have.

Webtechs

Webtechs has handled local SEO for Scottsdale small businesses since 1997, managing GBP, NAP consistency, citations, and reporting as a single retainer rather than a stack of subscriptions. You get one point of contact, consolidated ownership of your local presence, and results you can see in rankings rather than in a dashboard you have to interpret yourself. See the portfolio for documented outcomes, then get a quote for local SEO services in Scottsdale.

Sources

For next steps: set up Google Business Profile at no cost, then visit BrightLocal’s or Whitespark’s pricing pages to match a plan to your specific gap.

Designer sketching wireframe for landing page
Written by webtechs

Landing Page Design That Converts: A Guide for Arizona Businesses

Designer sketching wireframe for landing page

If you’re running paid ads or local campaigns in Arizona and sending traffic to your homepage, you’re leaving leads on the table. The single best move is to hire a conversion-focused local provider to build an ad-ready landing page with message match, mobile speed, and tracking built in from day one. Webtechs, based in Scottsdale, has been doing exactly this for small and mid-sized businesses since 1997.

Before you request a quote, ask for two things:

  • Ad-readiness confirmation: Does the page preserve UTM parameters, load under 3 seconds on mobile, and include your conversion pixel?
  • Measurement plan: Will you receive GA4 event tracking, form-submission goals, and a testing roadmap before launch?

Then contact Webtechs to review their portfolio and get a scoped quote for your campaign.


Key Takeaways

A conversion-focused landing page built for your specific ad source and audience is the most direct way to improve campaign ROI without increasing ad spend.

Point Details
Message match is the priority The page headline must mirror the ad copy; misalignment causes bounces even on well-designed pages.
Require a speed SLA Ask for a specific mobile load-time commitment before signing any proposal.
Track before you launch GA4 events, conversion pixels, and UTMs must be verified on a staging URL before the page goes live.
Short forms convert more Use three fields or fewer for volume; add multi-step logic only when lead quality matters more than quantity.
Webtechs is the local option Webtechs builds ad-ready landing pages for Arizona businesses with full tracking setup and testing support included.

Table of Contents

What does landing page design actually include?

A landing page is a single-purpose web page built around one conversion goal: a phone call, a form fill, an appointment booking, or a download. Unlike a homepage, it has no navigation menu, no competing offers, and no distractions. Every element points the visitor toward one action.

The difference between a homepage and a landing page matters most when you’re paying for traffic. A homepage serves everyone who visits your site. A landing page serves the specific person who clicked a specific ad, email, or social post. That distinction is why landing page best practices consistently recommend removing navigation and keeping the page focused on a single conversion goal.

Common use cases for Arizona businesses:

  • A roofing company running Google PPC ads for storm-damage repairs
  • A plumbing service promoting a seasonal drain-cleaning special
  • A medical practice booking new-patient appointments from Facebook ads
  • A local event organizer collecting RSVPs from an email campaign
  • A real estate agent capturing buyer leads from Google Local Services Ads

Each of these campaigns needs its own dedicated page. Sending that traffic to a general homepage almost always reduces conversion rates because the message on the page doesn’t match the promise in the ad.


Which businesses get the most from a dedicated landing page?

The verticals that see the biggest return from dedicated landing pages share one trait: high local intent. Someone searching “emergency AC repair Scottsdale” or “roofing estimate Phoenix” is ready to act. If the page they land on matches that exact intent, conversion rates climb. If it doesn’t, they bounce.

High-value Arizona verticals:

  • Home services: Roofing, HVAC, plumbing, electrical, and pest control all run seasonal campaigns. Arizona’s summer heat makes AC and roofing campaigns especially time-sensitive, and a dedicated page for each promotion keeps messaging tight.
  • Medical and dental practices: New-patient acquisition from paid search requires a page that addresses the specific service, insurance acceptance, and location.
  • Legal services: Personal injury, family law, and immigration firms rely heavily on PPC. Cost-per-click in legal is high, so a page that converts at even a slightly better rate pays for itself quickly.
  • Real estate: Buyer and seller lead-gen pages tied to specific neighborhoods or property types outperform generic agent sites.
  • Fitness and wellness: Gyms, yoga studios, and med spas run offer-specific pages for free trials, consultations, or seasonal promotions.

Campaign types that require a landing page:

  • Google Search and Display PPC campaigns
  • Meta lead ads with an off-platform destination
  • Google Local Services Ads follow-up pages
  • Email promotions with a time-sensitive offer
  • Retargeting campaigns with a specific message for warm audiences

Arizona’s seasonal demand patterns add another layer. Roofing and HVAC companies often need new pages built quickly when a weather event drives search volume. A provider who understands local timing can turn a campaign around faster than one who doesn’t.


What should a professional landing page build deliver?

A full landing page service is more than a design file. Here’s what you should expect as concrete deliverables before you sign off on any proposal.

Core deliverables:

  • Hero section: A benefit-driven headline that mirrors the ad copy, a supporting subheadline, and a CTA button above the fold
  • Conversion-focused copy: Written to match the specific ad source and audience, not repurposed from the homepage
  • Form setup: Single-step or multi-step forms with conditional logic, spam protection (honeypot or reCAPTCHA), and server-side validation
  • Tracking and analytics: GA4 event tracking, ad platform conversion pixels (Google Ads, Meta), and UTM parameter alignment
  • Responsive layout: Mobile-first design with performance optimizations including compressed images, critical CSS, and lazy loading
  • A/B test scaffold: At minimum, a second headline variant and CTA variant ready to test after launch

Optional but worth asking about: video integration, live chat or chatbot triggers, multi-step qualification flows, and dynamic text replacement that swaps the headline based on the keyword that triggered the ad.

Inspiration libraries like Lapa Ninja catalog over 7,300 real landing pages, which is useful when you want to show a designer the visual direction you’re after. Similarly, One Page Love tags examples by platform (Webflow, Framer, Tailwind), which helps estimate build complexity before scoping.

Pro Tip: Always request a staging URL before launch. Review the page on a real mobile device, submit the form yourself, and confirm the conversion fires in GA4 and your ad platform before the campaign goes live.


What technical foundations make a landing page actually perform?

Design gets the credit. Technical execution is what actually drives results. Message match and page speed are two of the highest-impact fixes for landing-page conversion problems, and both are technical decisions as much as creative ones.

Mobile-first design and load speed

Google’s mobile-first indexing means your page is evaluated on its mobile version first. More practically, most paid traffic in local markets arrives on phones. A page that loads slowly on mobile loses visitors before they read a single word. Ask any provider for a specific load-time commitment on mobile, not just desktop.

Hosting and CDN

Time-to-first-byte matters. A page hosted on a shared server with no CDN will load slower under paid-traffic load than one hosted on a performance-optimized stack with edge caching. For high-spend campaigns, this is worth a direct conversation with your provider.

Tracking stack

A properly instrumented landing page includes:

  • GA4 with custom event tracking for form submissions, button clicks, and scroll depth
  • Server-side or client-side conversion pixels for Google Ads and Meta
  • UTM parameters preserved through the URL so every lead is attributed to its source
  • CRM or webhook integration so leads flow directly into your sales process without manual export

For campaigns that generate phone calls, call tracking is a separate but critical layer. Dynamic number insertion lets you attribute inbound calls to the specific ad and keyword that drove them.

Form reliability

Forms are where conversions happen or don’t. Spam protection (honeypot fields plus reCAPTCHA), server-side validation, and a reliable delivery mechanism (webhook to CRM, Zapier, or direct email with a backup) are non-negotiable. A form that silently fails costs you leads you’ll never know you lost.

Ad-readiness checklist:

  • UTM parameters pass through to the thank-you page and CRM
  • Privacy policy and terms links present (required by Google Ads and Meta policies)
  • Page speed tested under simulated traffic load, not just on a clean cache
  • Conversion pixel fires on form submission, not on page load

Improving website conversions often starts with fixing these technical gaps before touching the design.

Speed and message match are the two levers that move conversion rates before you spend a dollar on design polish. A slow page with perfect copy still loses. A fast page with mismatched messaging loses just as fast.


What does the process look like, and what drives the price?

What does the process look like, and what drives the price? — overview diagram

A professional landing page build follows a predictable sequence. Understanding each step helps you evaluate proposals and avoid surprises.

Typical build process:

  1. Discovery (1–2 days): Define the single conversion goal, the ad source, the audience, and the message. This is where message match gets locked in.
  2. Wireframe (1–2 days): A structural layout showing content blocks, CTA placement, and form position before any visual design begins.
  3. Design (2–4 days): Visual design applied to the wireframe, including brand colors, typography, imagery, and mobile layout.
  4. Build (2–5 days): Development of the live page with all integrations: forms, tracking, pixels, and CRM connections.
  5. QA and tracking verification (1–2 days): Cross-device testing, form submission testing, and pixel verification in GA4 and ad platforms.
  6. Launch and test scaffold (1 day): Page goes live with UTMs active and at least one A/B variant ready to run.
  7. Test and iterate (ongoing): A multi-week testing window with predefined conversion thresholds before declaring a winner.

A stage-based approach that organizes work by impact (before the click, above the fold, body, form, mobile, testing) is the most reliable way to prioritize what gets built and tested first.

What drives the price:

  • Single page vs. multi-variant build (two or more test variants cost more)
  • Custom copywriting vs. client-supplied copy
  • Form complexity (simple contact form vs. multi-step qualification flow)
  • Custom integrations (CRM, scheduling software, webhook delivery)
  • Animation and interaction level
  • Ongoing hosting, maintenance, and A/B testing retainer

Template and component libraries can reduce build time significantly for straightforward campaigns without sacrificing core conversion patterns. For clients who need a fast turnaround, this is worth discussing upfront.

Questions to ask when comparing proposals:

  • What is your specific load-time SLA on mobile?
  • Can you show me a sample measurement plan from a past project?
  • Who owns the analytics account and conversion data?
  • What is your testing cadence, and how do you define a winning variant?

Why Webtechs is a strong local choice for Arizona businesses

Webtechs has been building conversion-focused web assets for Arizona businesses since 1997. That’s not a credential to gloss over. Local market experience means understanding seasonal demand cycles, the competitive landscape in Phoenix and Scottsdale, and the specific ad platforms that drive local intent traffic.

What sets the Webtechs approach apart:

  • Conversion-first process: Every build starts with message match. The headline on the page is written to mirror the ad that sent the visitor there.
  • Speed-first build: Mobile performance is treated as a requirement, not an afterthought.
  • Full tracking setup: GA4 event tracking, ad platform pixels, and UTM alignment are included in the build, not billed as add-ons.
  • Flexible service model: Project-based builds for one-time campaigns, plus optional retainers for A/B testing, hosting, and ongoing optimization.
  • Local credibility: Client testimonials from Arizona businesses reflect real results in competitive local verticals.

For businesses in home services, medical, legal, or real estate, the combination of local knowledge and a conversion-first process is the difference between a page that looks good and one that actually generates leads. You can review Webtechs’ SEO case studies for a broader picture of measurable outcomes across local verticals.


Portfolio snapshots and case-study highlights

Real results matter more than promises. Here are three representative project types from Webtechs’ Arizona work.

Roofing lead-gen page (PPC source)

A Scottsdale roofing company needed a dedicated page for its storm-damage repair campaign. The existing homepage had navigation, multiple service links, and no clear CTA. The new landing page stripped navigation, led with a benefit-driven headline matching the ad copy, and placed a click-to-call button above the fold. Quote-request volume from the campaign increased measurably within the first month. See the roofing SEO case study for context on the broader campaign.

Home services appointment page (Google Local Services)

A plumbing company running Google Local Services Ads needed a follow-up page that matched the trust signals Google’s platform creates. The page included license information, a five-star review count, and a short multi-step form that qualified leads before submission. Form completion rates improved compared to the previous single-field form, and lead quality increased because unqualified requests were filtered earlier in the flow.

Medical practice new-patient page (Facebook Ads)

A Scottsdale medical practice ran a Facebook campaign targeting new patients for a specific service. The landing page matched the ad’s visual style, included insurance acceptance details, and used a single-step appointment-request form. The campaign generated a consistent flow of qualified new-patient inquiries within the first 30 days.

For a broader view of design directions and visual patterns, Lapa Ninja’s gallery and One Page Love are worth browsing before your briefing call.


A research-backed conversion checklist for your landing page

Use this checklist when briefing a provider or reviewing a completed build. Items are ordered by impact.

Conversion checklist:

  • Message match first: The headline must mirror the ad copy that sent the visitor. This is the single most common fix that produces measurable lifts, per industry best practices.
  • CTA above the fold: The primary call-to-action button must be visible without scrolling on mobile.
  • Outcome-focused CTA copy: “Get my free quote” and “See contractor pricing” outperform “Submit” because they describe what the visitor receives, not what they do. HubSpot’s guidance confirms outcome-focused CTAs convert better.
  • Social proof placement: A star rating, review count, or short testimonial placed near the CTA reduces hesitation at the moment of decision.
  • Short form: Three fields or fewer for high-volume campaigns. Use multi-step forms with conditional logic when lead quality matters more than volume.
  • Speed on mobile: Test with a real device on a cellular connection, not just a desktop browser.
  • Tracking verified before launch: GA4 event, conversion pixel, and UTM all confirmed in a pre-launch QA pass.
  • No navigation: Remove the site header and footer nav. Unbounce’s research validates this as a consistent conversion lift.

High-performing CTA templates:

CTA Type Example Copy Why It Works
Outcome-focused “Get my free roofing estimate” States what the visitor receives
Urgency + outcome “Book my AC tune-up before summer” Combines timing with a clear benefit
Low-commitment “See our project photos first” Reduces friction for cold traffic
First-person “Start my free consultation” Personalizes the action

Data-backed rules on headline clarity, proof placement, and form length provide a prioritized list of elements to test for measurable lifts. Pair this checklist with lead-funnel automation to ensure every form submission flows into your CRM without manual handling.

Pro Tip: Run A/B tests for at least two full weeks before declaring a winner. A single weekend’s data can skew results significantly. Define your success metric (form submissions, not just clicks) before the test starts.


What I’ve learned from landing page projects

Most clients come to us focused on design. They want it to look professional, match their brand, and feel modern. That’s reasonable. But the pages that actually move the needle are the ones where we spent the most time on the brief, not the mockup.

Message match is unglamorous work. It means reading the ad copy, understanding the audience’s specific intent, and writing a headline that answers the question the visitor arrived with. When that alignment is tight, even a visually simple page converts well. When it’s loose, a beautiful page still loses visitors in the first five seconds.

In the first 90 days after launch, clients typically see one of two things: either the page performs immediately because the message and offer are strong, or the data reveals a specific gap (usually a headline that’s too generic or a form that’s too long) that a single test can fix. Either outcome is useful. The worst outcome is launching without tracking and never knowing which it was.


Webtechs can build your Arizona landing page now

Webtechs builds conversion-focused landing pages for Arizona businesses that are running or planning paid campaigns. A project quote includes a speed SLA for mobile, full GA4 and conversion pixel setup, and one month of A/B testing support after launch.

Webtechs

The process starts with a scoped brief: your campaign goal, ad source, and target audience. From there, Webtechs delivers a wireframe, a conversion-focused build, and a measurement plan so you know exactly what you’re getting and how results will be tracked.

View the Webtechs portfolio to see past Arizona projects, or review the web design pricing page to benchmark your quote. Ready to move forward? Contact Webtechs directly to request your scoped landing page proposal.


Sources

The following sources informed the checklist, process guidance, and CTA recommendations in this article.

1 2 3 6