

How to Write an Explainer Video Script That Converts

An explainer video script is a short, spoken-first document that makes one specific audience understand one thing and take one action, typically in 60–90 seconds. Every word is written to be heard, not read. Before you open a blank doc, lock three things: your single goal, your one audience, and your one CTA. Everything else follows from those three constraints.
Here is the instant checklist:
- One goal + one audience: Write a single sentence, e.g., “This video helps Phoenix-area HVAC owners understand why they lose leads without a follow-up sequence, and it asks them to book a free audit.”
- One message: Every line in the script must serve that sentence. If a line does not, cut it.
- One CTA: End on a single, explicit action. Not two options. One.
Pro Tip: Write your goal/audience sentence at the top of the doc before you draft a single word of script. It acts as a filter for every line you write.
Key Takeaways
A strong explainer video script succeeds by committing to one goal, one audience, and one CTA, then sizing every word to the target runtime before production begins.
| Point | Details |
|---|---|
| One goal, one audience, one CTA | Write your goal/audience sentence before drafting a single line of script. |
| 150 words per 60 seconds | Use 130–150 wpm as your word-count target; read aloud with a stopwatch to confirm. |
| Two-column AV format | Pair every voiceover line with a specific visual description to brief animators without rework. |
| Lock script before animation | Changing lines after animation begins multiplies revision cost; sign off the script first. |
| Webtechs for full production | Webtechs writes, storyboards, voices, and animates explainer videos for Arizona businesses, starting from a locked script. |
Table of Contents
- How do you write an explainer video script step by step?
- Which script structure fits your explainer video goal?
- Five copy-ready sample scripts you can adapt right now
- How to use a two-column AV script template for production
- How many words do you need for a 15, 30, 60, 90, or 120-second script?
- Editing checklist: how do you trim a script to one message?
- How many scenes do you need, and what assets should you prepare?
- What tools and workflow turn a script into a finished video?
- How Webtechs produces explainer scripts: process and briefing template
- When should you DIY your explainer video versus hire a studio?
- Webtechs handles script writing, production, and delivery for Arizona businesses
- Sources
How do you write an explainer video script step by step?
A repeatable process beats raw creativity every time. Follow these seven steps in order and you will have a production-ready draft faster than you think. This workflow aligns with the seven-step process Pexo recommends for building scripts that hit their runtime and land their message.
- Define your goal and audience. Write one sentence naming who watches, what problem they have, and what they should do after watching. This is not optional throat-clearing. It is the script’s constitution.
- Pick a structure. Choose from the five proven structures covered in the next section: problem–solution, how-it-works, product demo, founder story, or FAQ/onboarding. The structure determines your scene count and hook strategy.
- Write the hook first. Open on the viewer’s pain or desire, not on your product. “Still losing customers before they even call you?” lands harder than “Welcome to Acme Solutions.” You have about three seconds before a viewer decides to keep watching.
- Draft the body sized to runtime. At roughly 150 words per 60 seconds, a 60-second script runs about 150 words total. Write lean. Every sentence should earn its place.
- Add one proof point. A single specific fact, customer result, or concrete number does more work than three vague claims. “Our clients cut response time by half” beats “We help businesses improve efficiency.”
- Write one CTA. State it plainly and once. “Visit webtechs.net to get your free quote” is better than “Visit our site, follow us on social, or call us today.”
- Read aloud and trim. Time yourself with a stopwatch. If you run over, cut from the body, not the hook or CTA. Tighten clauses, drop filler adjectives, and shorten sentences until the script sits comfortably inside the target runtime.
Pro Tip: Lock the script before any animation starts. Changing a single line after frames are built can multiply production cost. A script review sign-off is not bureaucracy; it is cost control.
Which script structure fits your explainer video goal?
Structure is not a creative choice. It is a strategic one. The five structures below cover nearly every explainer scenario. Each maps to a specific goal, a hook strategy, and a typical scene count. Pexo’s copy-ready example scripts demonstrate how each structure plays out at standard runtimes.
The five structures at a glance
- Problem–solution: Opens on a pain point the audience recognizes instantly, names the cause, then presents your product as the fix. Best for awareness-stage campaigns and homepage hero videos.
- How-it-works: Walks through a process in three or four steps. Works well for SaaS products, apps, or any service where the mechanism is the selling point. Hook strategy: open with the outcome (“Imagine your invoices reconciling themselves”), then explain how.
- Product demo: Shows the product in action, screen by screen or feature by feature. Best for mid-funnel viewers who already know they have a problem and are evaluating options. Hook: lead with the most impressive result the product delivers.
- Founder story: A short personal narrative explaining why the company exists. Works for early-stage brands building trust, or for campaigns targeting buyers who care about mission. Hook: open with the moment the founder felt the problem firsthand.
- FAQ/onboarding: Answers the two or three questions new users always ask. Best for post-signup onboarding, customer success, or reducing support tickets. Hook: “Just signed up? Here is what to do first.”
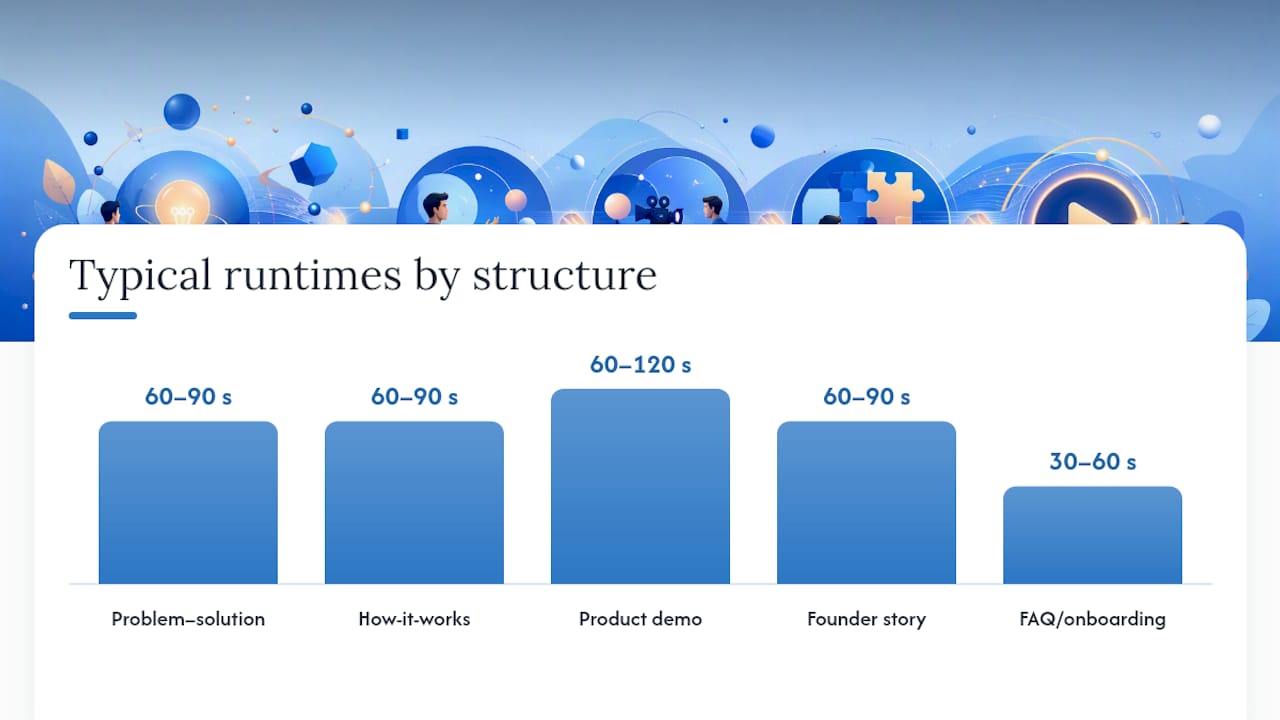
| Structure | Best for | Typical runtime | Scene count | What to show visually |
|---|---|---|---|---|
| Problem–solution | Awareness, homepage hero | 60–90s | 4–6 | Problem scene → cause → product intro → result |
| How-it-works | SaaS, process-driven services | 60–90s | 3–5 | Step-by-step UI or illustrated flow |
| Product demo | Mid-funnel evaluation | 60–120s | 4–7 | Screen recordings or animated UI walkthrough |
| Founder story | Brand trust, early-stage | 60–90s | 3–5 | Founder moment → problem → mission → CTA |
| FAQ/onboarding | Post-signup, support reduction | 30–60s | 3–4 | App screens, icons, short text callouts |
Five copy-ready sample scripts you can adapt right now
These scripts are calibrated to common runtimes. Swap the bracketed placeholders for your audience, product name, and CTA. Each sample includes a word count and a quick authoring note.
Pro Tip: Read each sample aloud before you adapt it. The rhythm is intentional. If a line feels awkward spoken, rewrite it before you swap the details.
Sample 1: Problem–solution (60 seconds, ~150 words)
[HOOK] Running a small business in Arizona means wearing every hat. But one hat costs you more than the rest: chasing down leads who never call back.
[PROBLEM] Many small businesses lose a significant portion of inbound leads due to lack of timely follow-up. By then, the customer has already called someone else.
[SOLUTION] [Product Name] automates your follow-up the moment a lead comes in. A personalized text goes out in under 60 seconds, every time, without you lifting a finger.
[PROOF] Businesses using [Product Name] report an increase in appointments in their first month.
[CTA] Start your free trial at [website].
Word count: ~95 words. Swap the industry pain point, the proof stat, and the CTA URL. The structure holds for any service business.
Sample 2: How-it-works (60 seconds, ~150 words)
[HOOK] What if getting your finances organized took three steps instead of three weeks?
[STEP 1] Connect your accounts. [Product Name] links to your bank, your invoicing tool, and your payroll quickly.
[STEP 2] Set your rules. Tell the system how to categorize expenses, and it learns your preferences automatically.
[STEP 3] Review and export. Every Friday, a clean summary lands in your inbox, ready for your accountant.
[CTA] Try [Product Name] free at [website].
Word count: ~90 words. This structure works for any product with a clear, sequential process. Adjust step labels to match your actual workflow.
Sample 3: Product demo (90 seconds, ~225 words)
[HOOK] Scheduling a team across multiple locations used to take [Founder Name] a long time every Monday morning. Now it is much quicker.
[DEMO BEAT 1] Open [Product Name] and click “Build Schedule.” The system pulls in your team’s availability, your location hours, and last week’s demand data automatically.
[DEMO BEAT 2] Drag and drop to adjust. Need to swap a shift? One click sends the change to both employees and updates the master calendar instantly.
[DEMO BEAT 3] Publish with one button. Every team member gets a notification on their phone. No group texts. No spreadsheets. No confusion.
[PROOF] Teams using [Product Name] report significantly reduced scheduling time.
[CTA] See it live. Book a free demo at [website].
Word count: ~130 words. For a 90-second script, you have room for three demo beats. Keep each beat to one screen or one action.
Sample 4: Founder story (60 seconds, ~150 words)
[HOOK] In 2019, [Founder Name] spent a large amount on a website that brought in no new clients.
[STORY] The site looked great, but it was invisible on Google and no one found it. That experience led [Founder Name] to build [Company Name]: an agency that makes sure small businesses actually get found online.
[WHAT WE DO] We handle your SEO, your content, and your local listings, so you show up when customers in your area are searching.
[CTA] Find out what your site is missing. Get a free audit at [website].
Word count: ~90 words. The founding moment must be specific and relatable. A vague “we saw a gap in the market” kills the trust this structure is built to create.
Sample 5: FAQ/onboarding (30 seconds, ~75 words)
[HOOK] Just signed up for [Product Name]? Here are the three things to do first.
[FAQ 1] Connect your calendar. It takes 30 seconds and unlocks the scheduling features.
[FAQ 2] Invite your team. Add up to five members on the free plan.
[FAQ 3] Set your first reminder. Pick a task, set a date, done.
[CTA] Questions? Hit the chat icon in the bottom right corner.
Word count: ~70 words. Keep onboarding scripts under 45 seconds. Viewers already signed up; they need direction, not persuasion.
How to use a two-column AV script template for production
The two-column audio/visual (AV) format is the industry standard for briefing animation teams. The left column holds your voiceover, line by line. The right column describes exactly what appears on screen during each line. StudioBinder’s explainer script template follows this five-step script-first workflow: define the idea, write the voiceover, plan visuals, time the script, then share for review.
According to Boords, a two-column AV format is critical for reducing costly animation rework because it lets animators and stakeholders approve visuals before a single frame is built.
AV template snippet
| Scene | Voiceover (Audio) | Visuals (Video) |
|---|---|---|
| 1 | “Running a small business in Arizona means wearing every hat.” | Animated character juggling icons: phone, invoice, calendar |
| 2 | “But one hat costs you more than the rest: chasing leads who never call back.” | Character drops icons; one labeled “Lost Lead” floats away |
| 3 | “[Product Name] sends a follow-up text the moment a lead comes in.” | Phone screen animation showing text sending in real time |
| 4 | “Businesses report booking 30% more appointments in month one.” | Animated bar chart rising; stat appears as text callout |
| 5 | “Start your free trial at [website].” | Logo lockup + URL on screen; CTA button animates in |
How to fill the template
- Write the voiceover column first, one line per scene beat.
- Keep each VO line to one idea. If a line contains two ideas, split it into two rows.
- Describe visuals specifically: “animated bar chart” beats “graphic showing growth.” Animators cannot read your mind.
- Lock the VO column before sharing. Mark it “APPROVED” so animators know which column is final.
- Share the doc as a comment-enabled file (Google Docs or Notion work well). Stakeholders comment on the visuals column only, not the VO.
Pro Tip: Add a “Status” column to the right of Visuals with values like Draft / Approved / In Production. This single column eliminates most of the “wait, which version are we animating?” confusion.
How many words do you need for a 15, 30, 60, 90, or 120-second script?
At a natural spoken pace of roughly 130–150 words per minute, the math is straightforward. Pexo’s pacing guidance pegs 150 words to 60 seconds as a practical rule of thumb. Slower, warmer delivery styles sit closer to 130 wpm; faster, energetic reads push toward 150 wpm.
How to test your pacing before you record
- Print or display the script in plain text, no formatting distractions.
- Read aloud at the pace you expect the voiceover artist to use. Use a stopwatch, not a mental count.
- If you run over by more than five seconds, cut from the body, not the hook or CTA.
- Factor in music beats and visual transitions. A two-second pause for a logo reveal eats into your word budget.
- Run a text-to-speech (TTS) pass using a tool like Google’s TTS or a scratch read in Runway ML to hear the rhythm before committing to a paid voiceover session.
One rule worth keeping: if your script is trying to make two separate points, it is actually two scripts. Split it, or cut one point entirely. A 60-second video that makes one argument clearly outperforms a 90-second video that makes two arguments vaguely.
Editing checklist: how do you trim a script to one message?
Here is how to fix that.
The editing checklist
- Cut jargon. If a viewer would need to Google a term, replace it with plain language.
- Shorten clauses. “In order to help you understand how our platform works” becomes “Here is how it works.”
- Remove the second message. Find the line where the script pivots to a new idea. Cut everything after it or build a separate video.
- Keep one proof point. Two statistics compete for attention. One sticks.
- One CTA only. If you wrote “visit our site or call us today,” delete one.
- Read it aloud one final time. Any line that trips your tongue will trip the voiceover artist.
Before and after: one line, tightened
Before: “Our platform is designed to help small business owners who are struggling with managing their customer relationships more effectively and efficiently, which can lead to better outcomes for their business overall.”
After: “Our platform helps small business owners manage customer relationships without the chaos.”
The before version runs 35 words and says nothing specific. The after version runs 14 words and implies a concrete pain point. That is the edit.
Common mistakes that kill explainer video performance
- Opening on the product. “Welcome to [Company Name]” is the single most common opening line and the least effective. Open on the viewer’s problem instead.
- Multiple CTAs. Every additional CTA you add reduces the chance the viewer takes any action at all.
- Overstuffing scenes. Three ideas in one scene means the animator has to choose which to show. They will guess wrong. One idea per scene.
- Writing for the eye, not the ear. Dense noun phrases and long subordinate clauses read fine on a page and sound terrible spoken aloud.
Pro Tip: Before you send the script to production, run a quick TTS pass using a free tool. If the synthesized voice sounds robotic or rushed, your sentences are too long or your punctuation is off. Fix the script, not the voice.
How many scenes do you need, and what assets should you prepare?
Scene count is one of the most overlooked decisions in script planning. Too many scenes and the animation feels rushed. Too few and the video drags. A 30–60 second script typically needs 3–5 scenes. A 90-second script can support 4–7 scenes comfortably.
Fewer scenes is almost always better. Each scene transition costs time and risks losing the viewer’s thread. A single well-illustrated scene with a clear visual metaphor does more work than three quick cuts.
Asset checklist for your animation brief
- Icons: One icon per concept. Use a consistent style (flat, outline, or filled) across all scenes.
- Character frames: If you use an animated character, define three to five poses or expressions upfront. Animators build from a character sheet.
- Product screenshots or UI captures: Export at 2x resolution. Annotate which screen state matches which VO line.
- Music cue: Specify tempo and mood (e.g., “upbeat, 120 bpm, no lyrics”). Music affects pacing more than most clients expect.
- SFX: Note any specific sound effects (notification ping, button click) in the visuals column of your AV script.
- On-screen text: Use it to reinforce the spoken word, not repeat it verbatim. If the VO says “30% more appointments,” the on-screen text can show “30%” as a large callout, not the full sentence.
Scene count and example descriptions for a 60-second script
What tools and workflow turn a script into a finished video?
Once the script is locked, you have three realistic paths to a finished video: AI-assisted production, a mid-market template studio, or a full-service agency. Each has a different cost profile, speed, and level of control.

MyPromoVideos reports that a 60-second explainer can run anywhere from $500 to $25,000+, depending on animation style, script complexity, and revision rounds. Viralix puts the mid-market benchmark for a polished 60-second animated explainer at roughly $5,000–$8,000, and notes that script quality tends to drive performance more than raw production spend.
That last point matters. A great script in a $500 template video will outperform a weak script in a $10,000 custom animation. Spend the time on the script first.
Tool options and trade-offs
- AI script-to-video tools (e.g., Runway ML): Fast, low cost, good for internal content or social clips. Limited visual customization. Best when speed matters more than brand precision. For a broader look at AI tools for coaching and training videos, TechVideoBlog covers the current field well.
- Online template studios: Mid-range cost, pre-built animation styles, faster turnaround than custom. Best for standard explainer formats where a template style fits the brand.
- Mid-market studios: Custom animation, professional voiceover, storyboard review. Typical range: $3,000–$10,000 for 60 seconds. Best for homepage hero videos or investor decks where brand quality is non-negotiable.
- Full-service agencies: End-to-end production including strategy, scripting, animation, and distribution. Higher cost, longer timeline, but the script and the video are built together from day one.
If you want to explore AI script generators before you commit to a production path, that resource surveys the current tools and their actual outputs.
Recommended workflow: script to finished video
- Lock the script (signed off by all stakeholders).
- Build a storyboard or rough shot list from the AV template.
- Run a scratch voiceover for timing (TTS or a quick internal read).
- Create style frames for one or two key scenes before full animation begins.
- Animate approved scenes only.
- Final QA: check audio sync, on-screen text accuracy, and CTA legibility.
Pro Tip: A script-first pipeline, where the script is fully approved before any animation begins, is the most reliable way to control cost and timeline. Changing a line after animation starts multiplies revision cost fast.
How Webtechs produces explainer scripts: process and briefing template
Webtechs follows a script-first production process for every video production project. The script is written, reviewed, and signed off before any visual work begins. That discipline keeps revisions predictable and costs controlled.
The Webtechs script-to-video process
- Brief: Client fills out a one-page brief covering audience, goal, tone, CTA, and target length.
- Script draft: Webtechs writes a spoken-first script in the two-column AV format, calibrated to the agreed runtime.
- Script review: Client approves the VO column. Visual descriptions are refined in parallel.
- Storyboard and style frames: Key scenes are illustrated before full animation begins.
- Voiceover: Professional VO is cast and recorded against the locked script.
- Animation and delivery: Final video delivered in web-ready formats, sized for homepage, social, and email use.
Before and after: script trimmed and remapped
Before (first draft, unfocused):
“At Webtechs, we have been helping businesses in Arizona and across the country with their digital marketing needs since 1997, and we offer a full range of services including web design, SEO, content writing, video production, and much more, all designed to help you grow your business online.”
After (production-ready):
“Since 1997, Webtechs has helped Arizona businesses show up on Google and convert visitors into customers. Web design, SEO, and video, built together.”
The before version runs 54 words and lists features. The after version runs 27 words, names a specific outcome, and sets up the CTA naturally.
Briefing template: use this to request a quote or brief any studio
| Field | Your answer |
|---|---|
| Target audience | Who watches this video? (e.g., “Arizona HVAC owners”) |
| Single goal | What should they do after watching? (one action only) |
| Tone | Conversational / professional / energetic / calm |
| CTA | Exact URL or phone number to feature |
| Target length | 30s / 60s / 90s / 120s |
Pro Tip: Fill out this briefing template before you contact any studio, including Webtechs. A completed brief cuts the back-and-forth in half and gets you to a first draft faster. Studios price more accurately when the brief is specific.
When should you DIY your explainer video versus hire a studio?
Three criteria settle this decision for most small and mid-sized businesses.
Audience scale. If the video will be seen by a few hundred people in a low-stakes context (internal training, a niche product page), a DIY or AI-assisted approach is entirely reasonable. If it is the first thing a prospect sees on your homepage, the production quality signals your brand quality. That is not the place to cut corners.
Complexity. A simple problem–solution or FAQ script with flat icon animation is well within reach of template tools. A multi-scene product demo with custom characters, UI walkthroughs, and branded motion graphics is not. Trying to force complex animation through a template tool costs more time than it saves money.
Budget and time. AI-assisted tools can produce a usable 60-second clip in a day or two for under $500. A mid-market studio delivers a polished result in two to four weeks for $3,000–$10,000. A full-service agency runs $10,000–$25,000+ and takes four to eight weeks. The question is not which is cheapest. It is which fits the stakes of the placement.
For most small and mid-sized businesses, the right call is: write the script yourself using the process in this guide, then hire production for anything that will live on a homepage, in a paid ad, or in a sales deck. The script is the highest-leverage investment. Spend the time there first, and the production spend will go further regardless of which path you choose.
Webtechs handles script writing, production, and delivery for Arizona businesses
Writing a strong explainer script is half the job. Turning it into a finished, on-brand video that actually lives on your site and drives conversions is the other half. Webtechs has handled both sides for Arizona small businesses since 1997.
The Webtechs production service covers script writing, storyboarding, professional voiceover casting, animation, and final delivery in web-ready formats. Every project starts with a locked script, which keeps revision rounds predictable and production costs from spiraling. A finished explainer video from Webtechs is built to work as a homepage hero, a paid social asset, or an email embed, not just a standalone file.
Check the Webtechs portfolio to see examples of completed projects, or visit the pricing page to understand what a project at your scale typically costs. When you are ready to move forward, the briefing template in this guide is all you need to get a quote started.
Sources
The following resources supply templates, timing guidance, example scripts, and production cost benchmarks used throughout this article.
- Explainer Video Script Template — Example and Guide
- A seven-step process for writing an explainer video script
- Free Explainer Video Script Template | Boords
- Explainer Video Cost: 2026 Pricing Guide with Calculator
- Explainer Video Cost: What You’ll Actually Pay | Viralix Blog